Open your T3D file. On the Building menu, click Building. The latitude, longitude and time zone figures displayed in the Building dialog box were used for the shadow calculations when your geometry was exported to the Building Simulator.
The error has occurred due to the fact that these values do not match the global position indicated in the weather file that you have copied to your TBD.
To correct this, you should re-export your T3D and re-run the shadow calculations. You MUST merge with your existing TBD file; for one thing this will avoid loss of data. Tas will read the latitude, longitude and time zone from your weather file during the merge process and update the Building dialog in your T3D.
The latitude, longitude and time-zone displayed in your T3D file will now equal the global position given in the weather file. You will now be able to simulate your TBD file without re-encountering this error.
Only those building elements adjacent to a zoned space are exported to the Building Simulator. Apply a zone to the remaining spaces in your model in order to export the building elements omitted in the Analysis model.
Note You will not be able to apply a construction to these elements if they are not exported to the Building Simulator. You will therefore not be able to account for their thermophysical properties or thermal mass. Any heat transfer mechanisms taking place through this “unfinished” section of your building will be ignored by the calculation engine.
Make sure you have entered a daylight factor in your TBD file.
Daylight factors can be calculated using the Daylighting tools built into Tas3D.
A Surface Output Specification allows you to output surface data to a Simulation Data file, or TSD. You can output solar gain, aperture data, condensation, conduction, convection, long wave and temperature information using a Surface Output Specification.
You must apply the Surface Output Specification to the relevant surfaces.
If you want to use a surface to represent a SHW or PV panel then you should apply a Surface Output Specification to this surface.
Check the associated tutorials for more details.
Feature shades are defined by using numerical inputs in the Building Simulator.
In the Building Simulator, right-click anywhere in the tree-view window and on the context-menu, click Feature Shade. Select to which daytypes the feature shade will be operational. You should now be able to expand and collapse the Feature Shades folder within the tree-view. The feature shade profile should then be applied to the building element for which you intend to provide shade.
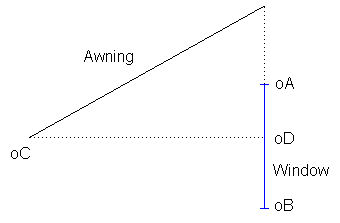
Surface Height: Enter the height of the surface to which you are applying the shading device. If you are applying it to a window type, then enter the height of your window. If you are applying it to a transparent building element, then enter the height of the transparent surface. In the diagram this distance is defined by OAOB.
Surface Width: Enter the width of the shaded element to which you are applying the shading device. This could be the width of your window type or transparent surface.
Overhang Depth: Enter the perpendicular distance between the shaded element and the far edge of the shading device. In the diagram this distance is defined by oCoD.
Overhang Offset: Enter the distance from the top edge of the shaded element to the lowest point on the shaded element at which the shading device and shaded element would connect if you were to subtend a perpendicular line from the transparent surface to the furthest edge of the shading device. Entering a negative offset denotes an overhang which extends downwards from the top edge. In the diagram this distance is defined by -oAoD.
Overhang Transmittance: Enter the transmittance of the shading device to solar radiation (0 = opaque; 1 = transparent).
Note Feature shades provide shade only to the surface of the building element to which it is applied.
Feature shades are defined by using numerical inputs in the Building Simulator.
In the Building Simulator, right-click anywhere in the tree-view window and on the context-menu, click Feature Shade. Select the daytypes on which the feature shade will be operational.
You should now be able to expand and collapse the Feature Shades folder within the tree-view.
The feature shade profile should then be applied to the building element for which you intend to provide shade.
Surface Height: Enter the height of the surface to which you are applying the shading device. If you are applying it to a window type, then enter the height of your window. If you are applying it to a transparent building element, then enter the height of the transparent surface.
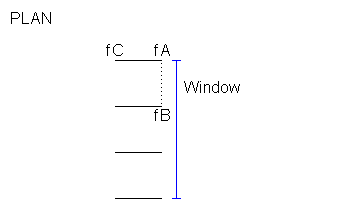
Surface Width: Enter the perpendicular distance between adjacent vertical fins. In the diagram this distance is defined by AB.
Left/Right Fin Depth: Enter the depth of each vertical fin. In the diagram this distance is defined by AC.
Left/Right Fin Offset: Enter the horizontal offset of the left and right side-fins from the left and right edges of the shaded surface, respectively. In the diagram this distance is zero, so enter this numerically as “0” (omit the quotes).
Left/Right Fin Transmittance: Enter the left and right side-fin transmittance to solar radiation (0 = opaque; 1 = transparent).
The vertical fins are perpendicular to the shaded surface.
Note Feature shades provide shade only to the surface of the building element to which it is applied.
Feature shades are defined by using numerical inputs in the Building Simulator.
In the Building Simulator, right-click anywhere in the tree-view window and on the context-menu, click Feature Shade. Select to which daytypes the feature shade will be operational.
You should now be able to expand and collapse the Feature Shades folder within the tree-view.
The feature shade profile should then be applied to the building element for which you intend to provide shade.
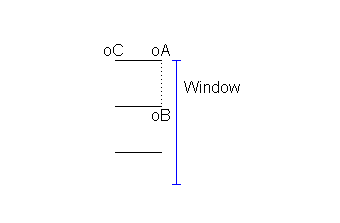
Surface Height: Enter the perpendicular distance between adjacent horizontal slats. In the diagram this distance is defined by AB.
Surface Width: Enter the width of the shaded surface. This might be a window type or an alternative transparent element, such as a surface representing a glazed facade.
Overhang Offset: If the slats were sloped (see alternative FAQ) then you would enter the distance from the top edge of the shaded element to the lowest point on the shaded element at which the shading device and shaded element would connect if you were to subtend a perpendicular line from the transparent surface to the furthest edge of the shading device. Entering a negative offset denotes an overhang which extends downwards from the top edge. However, in the diagram this distance is taken to be zero as we do not have sloped slats, so enter this numerically as “0” (omit the quotes).
Overhang Transmittance: Enter the slat transmittance to solar radiation (0 = opaque; 1 = transparent).
The horizontal slats are perpendicular to the shaded surface.
Note Feature shades provide shade only to the surface of the building element to which it is applied.
Feature shades are defined by using numerical inputs in the Building Simulator.
In the Building Simulator, right-click anywhere in the tree-view window and on the context-menu, click Feature Shade. Select to which daytypes the feature shade will be operational.
You should now be able to expand and collapse the Feature Shades folder within the tree-view.
The feature shade profile should then be applied to the building element for which you intend to provide shade.
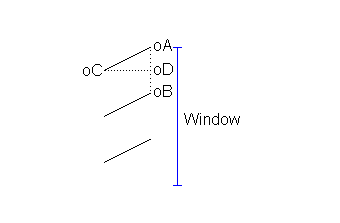
Surface Height: Enter the perpendicular distance between adjacent sloped slats. In the diagram this distance is defined by AB.
Surface Width: Enter the width of the shaded surface. This might be a window type or an alternative transparent element, such as a surface representing a glazed facade.
Overhang Depth: Enter the perpendicular distance between the shaded element and the far edge of the shading device. In the diagram this distance is defined by OCOD.
Overhang Offset: This is the vertical distance from the top of a slat to the bottom of the slat, creating a right-angled triangle such that the distance in the diagram AC becomes the hypotenuse. Therefore, you should enter the distance from the top edge of the shaded element to the lowest point on the shaded element at which the shading device and shaded element would connect if you were to subtend a perpendicular line from the transparent surface to the furthest edge of the shading device. Entering a negative offset denotes an overhang which extends downwards from the top edge. In the diagram this distance is defined by -oAoD.
Overhang Transmittance: Enter the slat transmittance to solar radiation (0 = opaque; 1 = transparent).
Note Feature shades provide shade only to the surface of the building element to which it is applied.
If you try to simulate your TBD file from days 1 through to 365 but your T3D file was exported with shading calculations performed for fewer than 365 days, then you will encounter this error.
When you export your geometry from the 3D Modeller to the Building Simulator, the Export dialog box contains a section denoted Shading Calculations. To export shading data for the entire year to the Building Simulator, you need to enable the Yes checkbox and enter 1 in the First Day text-entry box and 365 in the Last Day field. You will then be able to simulate your TBD file for the entire year.
This error indicates that there is a problem with how you have constructed the set of IZAMs in your model.
When you create an IZAM to move air at a particular mass flow rate (measured in kg/s) into a zone, either entering from outside or from another zone in your model, you need to set up a second IZAM to move the air out of the zone again.
The outgoing air must be set to leave the zone at the same mass flow rate as the incoming air.
Alternatively, you can create an aperture type with the same schedule as your incoming IZAM and apply it to a surface within the zone to allow the incoming air to escape naturally.
The aperture type must be applied to the relevant daytypes in order to work in synchronisation with the incoming IZAM.
A null surface will also allow the air to escape and will not need an aperture type to be applied.
Caution if the size of your aperture is too small relative to the magnitude of the mass flow rate, then a build up of pressure can accumulate and cause a different error: “Max pressure exceeded in flow analysis”.
To resolve an IZAM imbalance, you should give careful consideration to each of the following items:
The mass flow rate of each IZAM set to From Outside.
The mass flow rate of each IZAM set to To Outside.
The mass flow rate of each IZAM set to Source Zone (this is the zone from which the air is originating) and make a note of the zone to which you have applied the IZAM (this is the zone that is set to receive the IZAM from the source zone).
The daytypes applied to each IZAM.
The schedules applied to each IZAM.
The setback values applied to each IZAM.
Any aperture types applied to IZAM zones.
Any null surfaces connecting to IZAM zones.
Tip It is a good idea to create a spreadsheet to manage these data. You can use a MS Excel AutoFilter to help you keep track of IZAM movement based on different daytypes and schedules.
You should also consider creating your IZAMs incrementally, i.e. create only a few IZAMs and then simulate your model to check that they have been set up properly. Then continue to simulate each time you set up a few more IZAMs to ensure they have been properly balanced.
This avoids the problem of having to identify a bad IZAM from a large set, which can be time consuming.
This error indicates that there is a problem with how you have constructed the set of IZAMs in your model. If you have set up your model to allow an IZAM to escape from a zone by natural means, i.e. through an open aperture, then you must ensure that the schedule of the aperture is defined such that the aperture will be open when the IZAM is operating. The opening proportion of the aperture relative to the mass flow rate of the IZAM must also be sufficient to allow the air to escape without a build up of pressure forming as the simulation proceeds.
Open your TBD file. Click on the Building Summary and check that the Wind Pressure Coefficients File text-entry box is empty. That is unless you have run a CFD analysis to calculated wind pressure coefficients that you would like to use and have created the relevant file in the correct format.
The error message provides information for you to identify the zone causing the error. On the tree-view, click the Zones folder. Find the entry in the table with the corresponding zone name. Double-click the zone in the table and click the Surfaces tab on the right-hand side for information on zone surface areas.
Ultimately, in the 3D Modeller, you will need to divide this zone using a new building element to reduce in area the large single surface, a new building element will be treated as a separate surface within the same zone or by splitting and applying a secondary zone to the space. You can use a null wall to further sub-divide the space.
In the Building Simulator, expand the Zones folder and then click on a zone. The contents overview displayed on the right-hand side provides a section containing three tabs: Internal Conditions, IZAMs and Surfaces.
Click on the Surfaces tab to display a table showing the number of surfaces within the zone, surface orientation, altitude, etc.
The table also shows the unit area of each surface. The sum of this column provides the total surface area of all surfaces within the zone.
If any one surface has an area greater than 49.5% of this total, then this error will be produced.
The error needs to be resolved before the simulation can proceed. Do this by opening your T3D file and dividing the zone into smaller zones, thus reducing the total number of surfaces.
The key point to remember is that the Upper Limit in the thermostat is not allowed to be less than the Lower Limit for any hour of the year.
The mismatch may be occurring on a particular hour in an hourly or yearly profile or might be due to the value entered in the Factor field, which is then multiplied by the Value.
Tip If you are using a yearly profile, then you can copy both the Upper and Lower Limit profiles into a MS Excel spreadsheet to help identify during which hours the overlapping limits occurs.
If you are using NCM Activities and the error occurs in your Reference building, then the problem is due to the fact that the NCM Activity SecSchl_Swim heats to 27ºC. The NCM Modelling Guide states that the Reference building should always cool to 26ºC. To resolve the conflict you should edit the Lower Limit in your “source” TBD file for SecSchl_Swim from 27 to 26ºC.
For schools, use the NCM Schools calendar.
For higher education establishments, use the NCM University calendar.
For all other buildings, use the NCM Standard calendar.
For solar overheating for schools (BB101 compliance) you MUST use the Standard calendar. Building Bulletin 101 states that schools are assumed to be occupied during the summer period.
Are you simulating over a network? If so, try saving your TBD file to a local drive on your machine and re-simulating.
Use the pre-simulation checks tool. Open your TBD file and on the Tools menu click Pre-Simulation Checks. On the Pre-Simulation Checks dialog box, enable the relevant checkboxes depending on your situation. Choose from: General, UK Building Regulations, BB101, Solar Overheating, PV, SHW. Click Perform Checks.
If the pre-simulation checks show that no problems were found, then this does not necessarily mean that your TBD has been set up correctly.
In TBD and click Building Summary. The number of zones will be displayed on the right-hand side window.