Learn to Code with Tas and Excel Lesson 1 - Setup
In this post, I’ll run through how to get ready to write your first Excel macro. If you haven’t already, I suggest you read the intro post to find out more.
With each post in this series, there will be a written explanation and a video demonstrating what to do.
1. License Tas
It might seem obvious, but please make sure your copy of Tas Engineering is licensed via the Register button in the Tas Manager.
If your copy of Tas isn’t licensed properly, your Macro might behave strangely and it can lead to some very hard to track down bugs.
2. Enable Excel developer Tab
When we’re writing macros in Excel, we do so in the Visual Basic for Applications window. The button to open this is hidden away in the Developer tab in the ribbon, which isn’t visible by default.
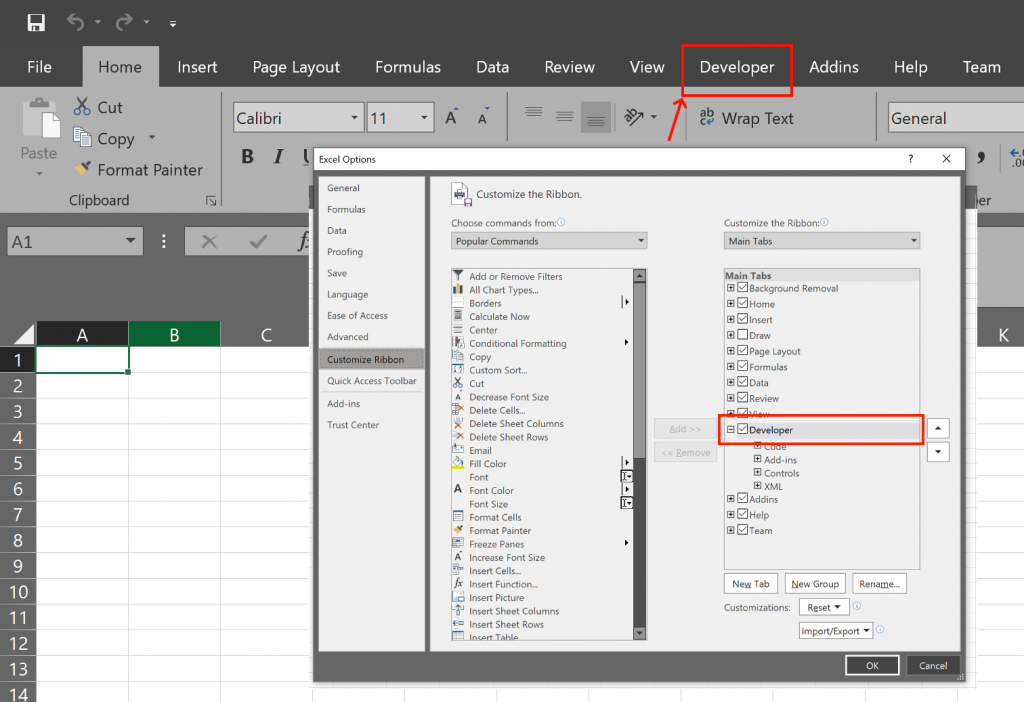
To enable it, click on File > Options > Customise Ribbon, and check the Developer checkbox.
The developer tab also allows us to run our macros, and add buttons to our spreadsheet to make running them quicker and easier.
Once you’ve enabled this tab, it’ll should always be visible in your ribbon.
And thats it! That’s pretty much all you need to do. Now you just need to open the VBA editor and write your first macro!
Writing your first macro
Add a new module
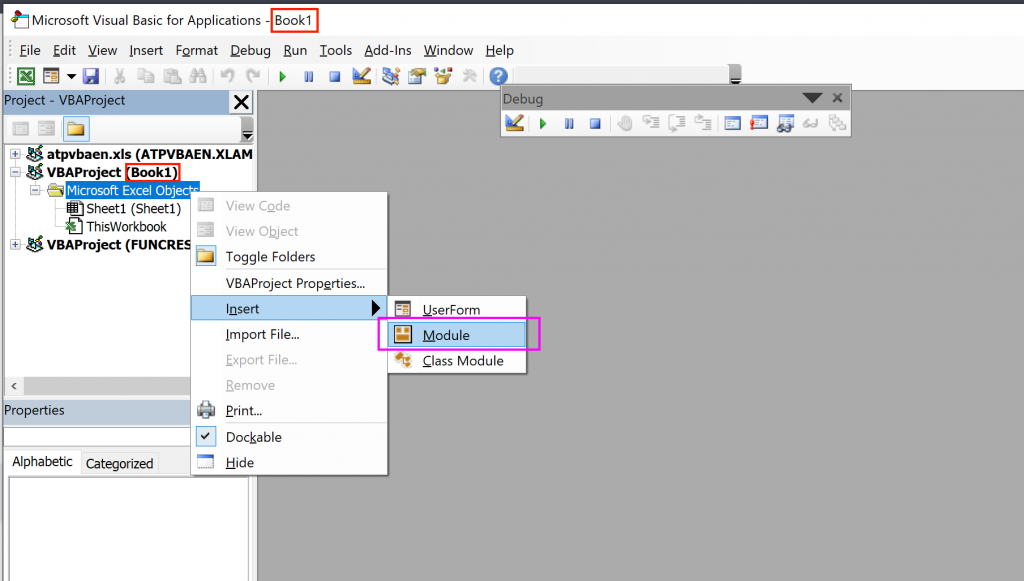
To open the Visual Basic editor, click on the Developer tab in the ribbon and click on the Visual Basic button. The VBA editor will pop up, and then you just need to add a module to start writing code:
If all goes according to plan, you’ve created your first module and you’ll be presented with a white document in which you can type code. In case you’re wondering what a module is, it;s just a way to organise different bits of code and group them together
At this point you can start writing macros, but they wont be able to use Tas yet. To automate Tas, you’ll need to reference the appropriate type libraries.
Reference Tas Type Libraries
The Tas type libraries are files that tell the excel programming language what you can do when interacting with the Tas software.
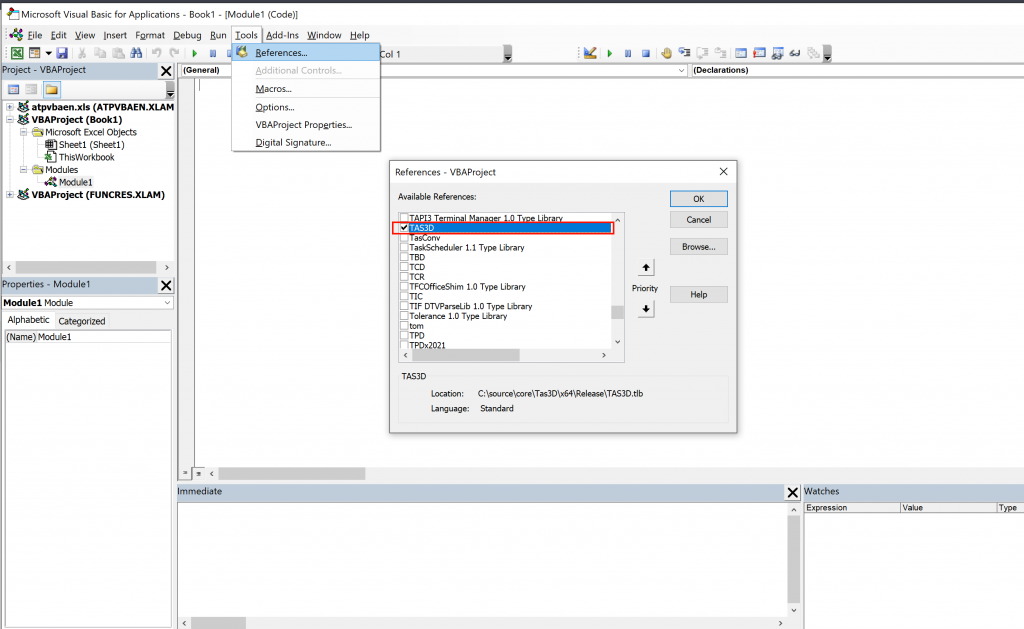
To reference the Tas3D type library, click on Tools > References in the VBA editor, and select Tas3D:
If you are writing a macro that operates on TBD files or TCD files, you’ll need to pick those type libraries instead. The full list is:
- 3D Modeller – Tas3D
- Building Simulator – TBD
- Constructions Database – TCD
- Calendar Database- TCR
- Internal Conditions Database – TIC
- Weather Database – TWD
- Systems – TPD
- Ambiens – TAI
The Object Browser
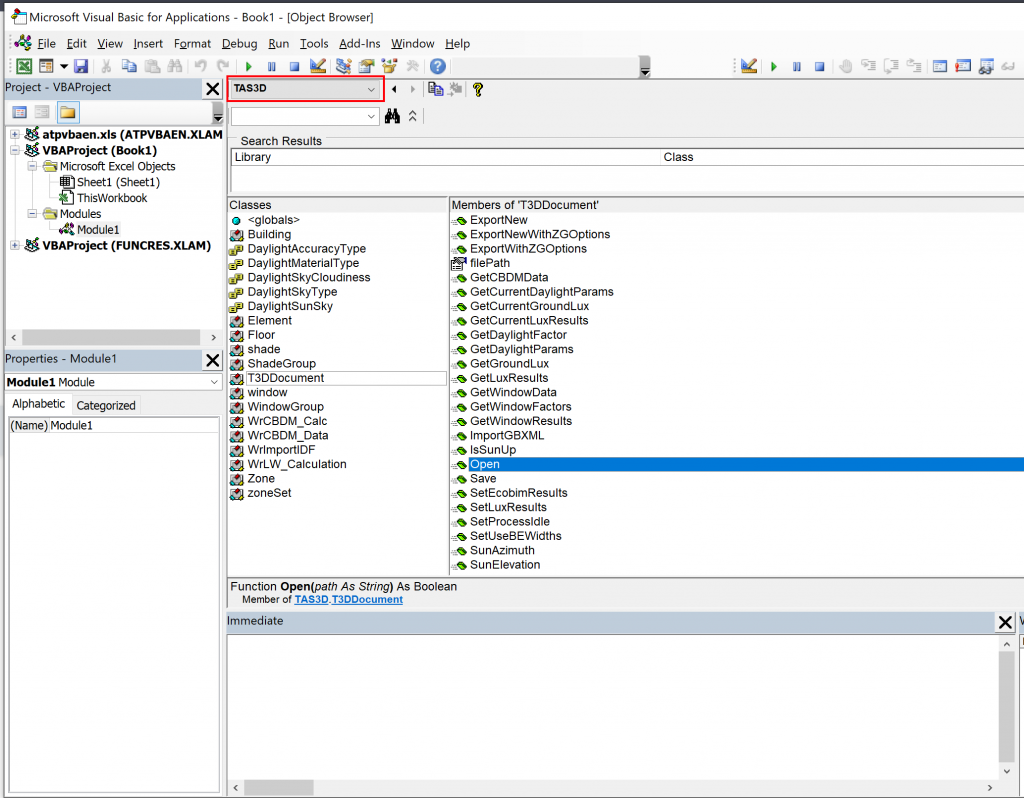
After you’ve referenced the Tas type libraries, you can see what functions are available for a type library using the Object Browser. To open it, just press F2 on the keyboard or click on View > Object Browser:
Hello, Tas3D!
Lets write some code. Copy and paste the below code into your new module. You’ll need to change the file path to a folder on your computer.
					Sub HeloTas3D()

    'Open a new instance of the 3D modeller
    Dim t3dApp As TAS3D.T3DDocument
    Set t3dApp = New TAS3D.T3DDocument

    'Create a new document using the instance we just opened
    t3dApp.Create


    'Change the building name to "Hello, World!"
    t3dApp.Building.Name = "Hello, World!"

    'Save the 3D modeller file. YOU NEED TO CHANGE THIS LINE!
    t3dApp.Save ("C:\users\hilmya\desktop\MyNewFile.t3d")

    'Close the file
    t3dApp.Close

    'Close the 3D modeller instance
    Set t3dApp = Nothing

    'Message box, so we can tell when its finished
    MsgBox "Finished!"
End Sub
To run your macro, press F5 on your keyboard. The macro will run, and you should get a new Tas3D file created at the location you specified in line 15 of the previous code snippet and you should get a message box pop up saying “Finished” if everything ran OK.
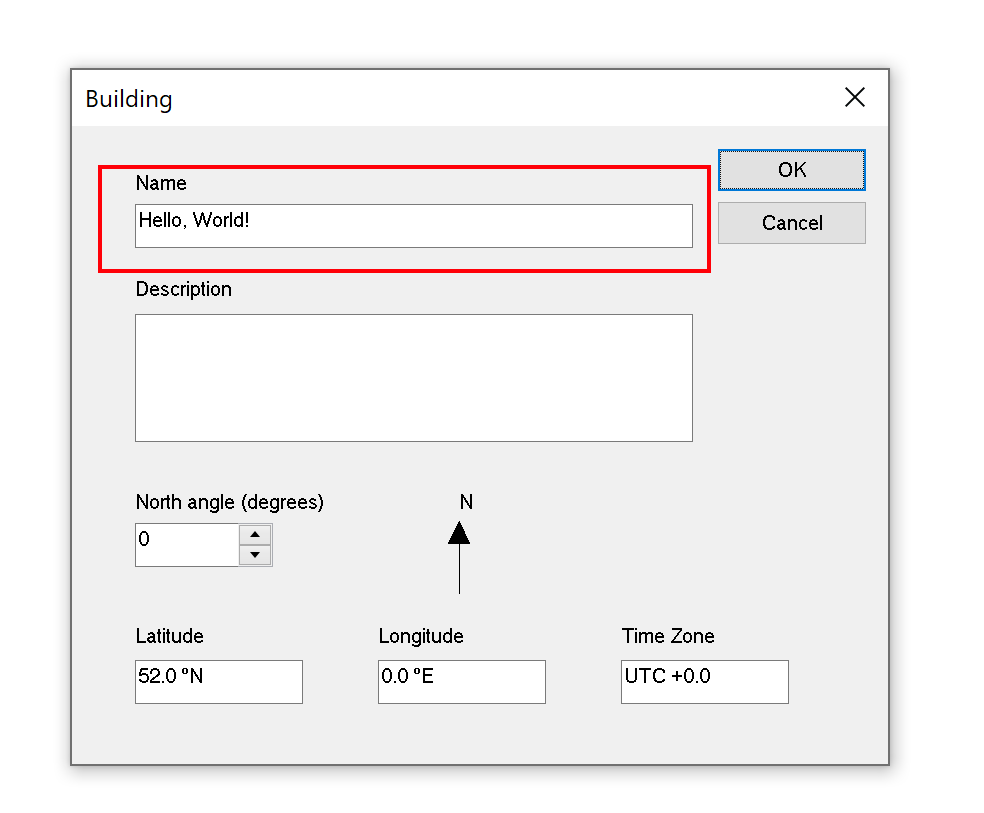
If you open the Tas3D file that was created when you ran your Macro and open the Building dialog (ctrl + B), you should see the phrase ‘Hello, World!’ in the building name field.
Rememebr, if you want to re-run your macro, you’ll need to delete the 3D modeller file first.
I don't understand the code!
Now that we’ve written and ran our first macro, lets go through each part of the Macro to understand whats going on in a bit more detail. We’ll start with creating a new instance of the 3D modeller:
					'Open a new instance of the 3D modeller
    Dim t3dApp As TAS3D.T3DDocument
    Set t3dApp = New TAS3D.T3DDocument
Line 1 is a comment – comments start with the apostrophe character, and allow us to leave notes to ourselves and our colleagues to help them understand the purpose of that section of code. Comments are really useful, as they can help us understand our intentions when we come back and review the code later.
Line 2 ‘Dimensions’ a new object reference variable called t3dApp with type TAS3D.T3Document. Variables represent data which can change throughout the execution of your program, and there are two broad types – primitive variables and object reference variables. We’ll discuss these more in the next section.
For now, you can think of a reference variable like a remote control – we can use the remote control to control an object; in this case, an instance of the 3D modeller is the object.
Line 3 actually creates a new instance of the 3D modeller, and links up this new instance to the ‘remote control’ reference variable we created on the previous line.
You said I opened a new instance of the 3D modeller, but where is it? I dont see it!
When we create instances of the Tas applications using programming languages, they remain hidden – they have no visible User Interface (UI). This doesn’t mean you can’t see them, though!
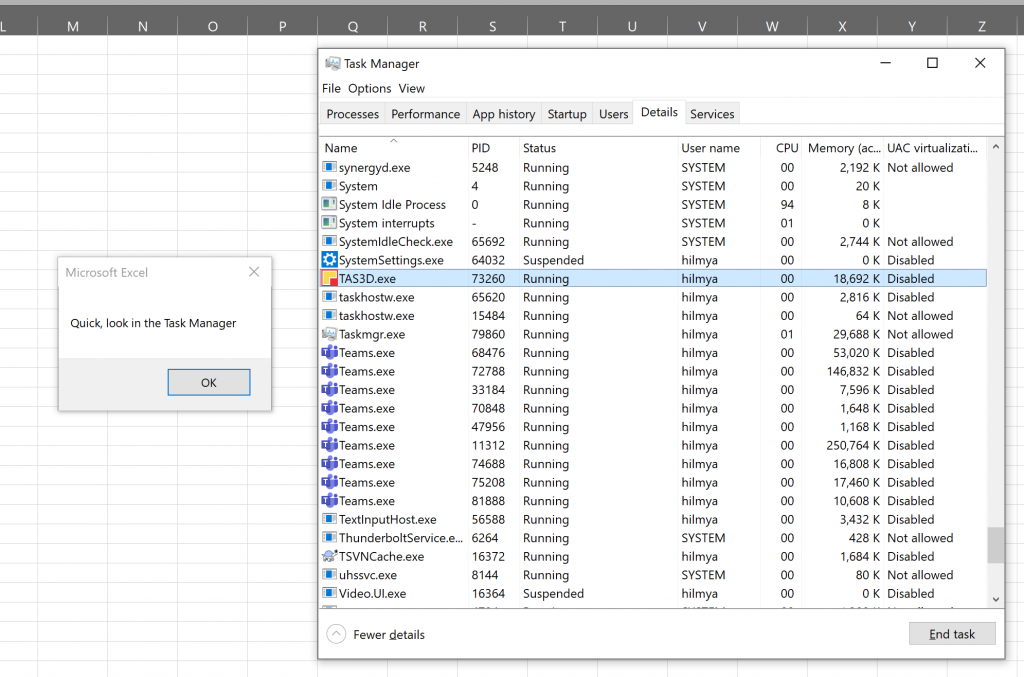
Run your macro again, but this time keep an eye on the ‘Processes’ list in the Windows Task Manager. You should see Tas3D appear when the macro starts, and dissappear when the macro finishes.
Too quick to see? We can add a message box to pause things so we can take a peek. Modify your macro like this:
					    'Open a new instance of the 3D modeller
    Dim t3dApp As TAS3D.T3DDocument
    Set t3dApp = New TAS3D.T3DDocument
    MsgBox "Quick, look in the Task Manager"
When you press OK, the macro will continue and the Tas3D instance will disappear.
					    'Create a new document using the instance we just opened
    t3dApp.Create
Next, as we’re creating a new 3D modeller document from scratch, we need to call the Create function.
This function tells the 3D modeller to make a new document – the 3D modeller creates default building elements, default zone lists and everything else you see when you create a new document using the user interface.
					    'Change the building name to "Hello, World!"
    t3dApp.Building.Name = "Hello, World!"
The 3D modeller file we just created has a Building property, and the Building property has a property called Name. In this step, we use the equals sign to change the value of that property to something else — in this case, the string “Hello, World!”. We used the equals sign earlier to ‘link up’ our Tas3D remote to our Tas3D object.
					'Save the 3D modeller file. YOU NEED TO CHANGE THIS LINE!
    t3dApp.Save ("C:\users\hilmya\desktop\MyNewFile.t3d")
Now we’re saving the file by calling the Save function — this is equivalent to pressing File > Save As in the 3D modeller. But as we don’t have a dialog to ask us where we want to save the file, we need to specify the file path using a string (the bit in the speech marks).
					    'Close the file
    t3dApp.Close

    'Close the 3D modeller instance
    Set t3dApp = Nothing
Next we use the Close function to close the file we created, and we set the t3dApp object reference variable to point to Nothing — this means it no longer controls the 3D modeller instance we opened earlier, so Excel will automatically close it as it can see we’re not using it any more.
					    'Message box, so we can tell when its finished
    MsgBox "Finished!"
Finally, we want to display a message box so its really clear that the macro has finished running. We do this using the MsgBox function thats built into excel, and we call this function using the string “Finished!”.
We’ve covered a lot in this first lesson and learned a lot of new things. Don’t worry if you feel overwhelmed, we’ll keep coming back to the things we’ve introduced in this first lesson as they’ll form the building blocks to more ambitious Macros!
If you haven’t watched the video for this lesson, I demonstrate and discuss the content of this lesson in more detail, so definitely watch it!
Details - Subroutines, Functions, Methods and Properties
Subroutines, functions and methods are essentially the same things and the terms often get used interchangably. They’re just ‘organisational blocks of code’, which can be re-used.
In VBA, subroutines cannot return a value but functions can. For example:
					'This function adds two numbers, and gives the value back to the code that executed it
Function AddNumbers(number1 As Double, number2 As Double) As Double
     AddNumbers = number1 + number2
End Function
					'This subroutine displays a message box containing the file path it is executed/called with
Sub FilePathMessageBox(FilePath As String)
    MsgBox FilePath
End Sub
The above function and subroutine have arugments – in the function they are called number1 and number2 and represent variables we wish to operate on within our function. Sometimes arugments are called Parameters.
Properties belong to Objects, (see the Details- Variables section), and are used to access variables that belong to that object. We saw one earlier when we accessed the Building property of the Tas3D document we created.
For more indepth information check out excel-easy.
Details - Variables & Objects
When a computer program is running, the computer program stores data in the computers memory. As a programmer, if you want to store data in memory and access it when your program is running, you can do so with Variables.
Lets look at the following simple macro:
Sub StringVariable()
Dim FirstName As String
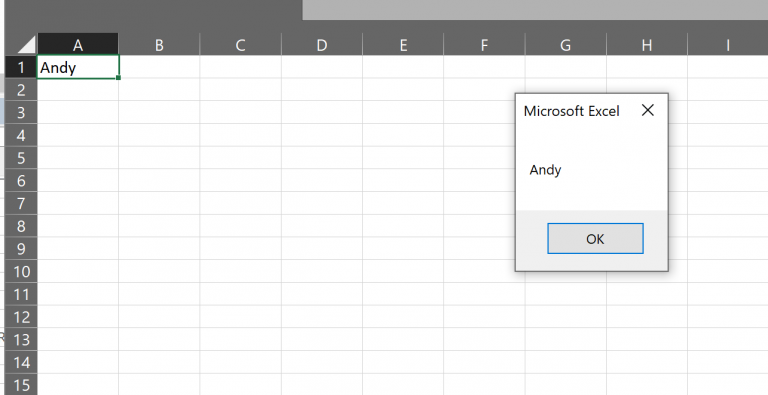
FirstName = Cells(1, 1)
MsgBox FirstName
End Sub
Here, we’re creating a String variable calle FirstName, and setting its value to whatever is in cell A1 in the current Excel spreadsheet. We then display a messagebox showing the value of that String:
This enables us to react dynamically to the data we have and make our macro operate accordingly.
I mentioned earlier that there are two broad types of variable – primitive variables and object reference varables. Primitive variables store simple values – things like text and numbers. Object reference variables store a reference to an Object – an Object is just a group of reference variables and possibly some functions associated with them.
Primitive Variables
- Integer – stores whole numbers, example- 56, -2, 12
- Single – stores small decimal numbers – 12.5, 8.0, 12.2545, -45.32
- Double – stores decimal numbers with more accuracy – 34.32234543476767
- Boolean – stores true/false values.
Non Primitive Variables
- String – stores text, example – “Hello, there!”
If you’ve made it this far and you’re still with me, well done! In the next lesson, we’ll make a macro that writes zone names to an existing 3D modeller file!