Learn to Code with Tas and Excel Lesson 3 – Tas3D Zone Writer pt 2

Learn to Code with Tas and Excel Lesson 3- Tas3D Zone Writer pt 2

In the last lesson, we created a macro that added zone names from an Excel spreadsheet to a 3D modeller file. Specifically, it:

  • Opened the 3D modeller
  • Opened an existing Tas3D file
  • Added a new zone group
  • Read the names of zones from the spreadsheet and added them as new zones to the new zone group
  • Saved and closed the file

In this lesson, we’ll continue where we left off and add some extra functionality to our macro. We’d like to extend our macro to:

  • Check for duplicate zone names
  • Sort the new zones into zone groups
  • Read the existing zones in the file

 So lets dive in.

Before we can start modifying our macro from the previous lesson to deal with duplicate zones and zone sets, we need to add a couple of columns to our spreadsheet so we’re on the same page:
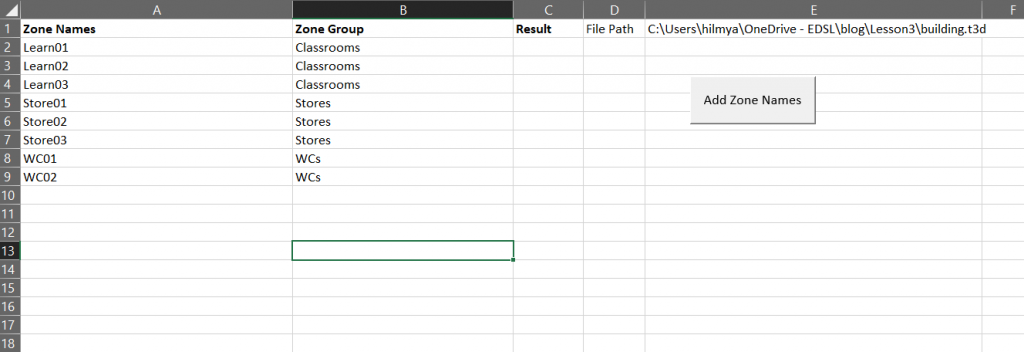
We need to add a heading to column B so we can use it for zone sets, another heading for column C so the macro can report whether it added the zone, and some sample zone names and zone set names.

Checking for duplicate zone names

To check for duplicate zone names, we’ll write a function that returns a Boolean (True/False) depending on whether a Tas3D file already contains a zone with that name. 

Lets take a look at the script for our function:

				
					Function ZoneExists(name As String, doc As TAS3D.T3DDocument) As Boolean
    
    'declare variables for our loop
    Dim curZoneIndex As Integer
    Dim curZone As TAS3D.Zone
    
    'set the initial zone index to 1
    curZoneIndex = 1
    
    'go through each zone in the building
    While Not doc.Building.GetZone(curZoneIndex) Is Nothing
    
        'set the curZone reference variable to the current zone
        Set curZone = doc.Building.GetZone(curZoneIndex)
        
        'if the zone has the name we are looking for, return true
        If curZone.name = name Then
            ZoneExists = True
            Exit Function
        End If
        
        'increment the zone index so we look at the next one in the file
        curZoneIndex = curZoneIndex + 1
    Wend
    
    'if we have checked all the zones and none match the name we are looking for, return false
    ZoneExists = False

End Function


This function a while loop to iterate over every zone in a Tas3D file, checking to see if the name of each zone matches the name passed into the function as a parameter. 

If the function finds a zone with the name it is looking for, it immediately returns True.

If the function searches through all the zones and does not find the name it is looking for, it returns False.

For more information about Functions, see the section at the end of lesson 1. 

Function breakdown: how does it work?

We’ll start by looking at the definition of our function:

				
					Function ZoneExists(name As String, doc As TAS3D.T3DDocument) As Boolean
    
    'Code goes here
    
End Function


Here, we have created a function called ZoneExists. This function has two parameters – the name of the zone we are looking for which is of type String, and the doc which is a reference variable to a Tas3D Document. The ‘As Boolean’ after the parameters is the return type of the function. This means when we call (use) the function, the function can return True or False. 

				
					    'declare variables for our loop
    Dim curZoneIndex As Integer
    Dim curZone As TAS3D.Zone
    
    'set the initial zone index to 1
    curZoneIndex = 1


Next, we declare some primitive and reference variables we will use when we are looking through each of the zones in the Tas3D document, inside our while loop. We have an integer called curZoneIndex to track the number of the zone we are currently examining, and we have a reference variable of type Tas3D.Zone called curZone, so we can more easily refer to the zone we are currently checking the name of. 

We also have to initialise the curZoneIndex variable to 1 (line 6), because in Tas3D, the first zone is assigned the number 1. 

				
					'go through each zone in the building
    While Not doc.Building.GetZone(curZoneIndex) Is Nothing
    
        'set the curZone reference variable to the current zone
            'TODO
        
        'if the zone has the name we are looking for, return true
            'TODO
        
        'increment the zone index so we look at the next one in the file
        curZoneIndex = curZoneIndex + 1
    Wend


Next comes the basic structure of our while loop; on line 1, we check to see whether the zone in the building with index = curZoneIndex exists. Remember, the condition of the while loop and the code within it run multiple times when the condition is true. Before we enter the loop for the first time, we are checking to see whether the first zone in the building exists. If it does not, the body of the while loop (lines 3-11) doesn’t get executed. 

Assuming we do enter the while loop, on line 11 we increment our curZoneIndex by 1 so that when the loop repeats, we check the next zone in the file. We’re now ready to fill in the rest of the functionality of the while loop, which have TODO comments on lines 5 and 8. 

				
					'go through each zone in the building
    While Not doc.Building.GetZone(curZoneIndex) Is Nothing
    
        'set the curZone reference variable to the current zone
        Set curZone = doc.Building.GetZone(curZoneIndex)
        
        'if the zone has the name we are looking for, return true
        If curZone.name = name Then
            ZoneExists = True
            Exit Function
        End If
        
        'increment the zone index so we look at the next one in the file
        curZoneIndex = curZoneIndex + 1
    Wend


On line 5, we set our curZone reference variable to the zone in the document with the index equal to curZoneIndex.

On line 8, we check to see if the name of that zone matches the name we passed into our function. If it does, we set the return value of the function to true (line 9), and exit the function early as we no longer need to examine any more zones. 

				
					    'if we have checked all the zones and none match the name we are looking for, return false
    ZoneExists = False


Finally, if we complete our while loop without finding a zone with a name that matches the one we’re looking for, we set the return value of the function to False to indicate a zone with that name does not exist in the file.

Finding existing Zone Sets

Lets quickly review the flow of our macro as it stands. Currently, it adds every new zone to a single zone set, which it creates before looking through the list of new zone names on the worksheet. 

If we were to modify our macro so it added a new zone set for each new zone, we have a potential problem. If we had multiple zones that were supposed to belong to the same zone set we’d end up making multiple zone sets with the same name! 

To overcome this problem, we need to create a function that looks through the zone sets currently in the file to see if there’s already one with the name we need. If there is, we need a reference to it so we can add zones to it. If there isn’t, we know we need to add a new zone set to the file. 

Lets see what such a function could look like:

				
					Function GetZoneSet(name As String, doc As TAS3D.T3DDocument) As TAS3D.zoneSet
    Dim curZoneSetIndex As Integer
    Dim curZoneSet As TAS3D.zoneSet
    curZoneSetIndex = 1
    
    While Not doc.Building.GetZoneSet(curZoneSetIndex) Is Nothing
    
        'set the current zone set reference to the next zone set
        Set curZoneSet = doc.Building.GetZoneSet(curZoneSetIndex)
        
        'check to see if the name matches what we're looking for. If it does, return the zone set.
        If curZoneSet.name = name Then
            Set GetZoneSet = curZoneSet
            Exit Function
        End If
    
        'increment the index so we look at the next zone set when the loop repeats
        curZoneSetIndex = curZoneSetIndex + 1
    Wend
    
    'If we finish the loop without finding the zone set, return nothing
    Set GetZoneSet = Nothing
    
End Function


This function works in a similar way to the ZoneExists function. The return type is different, and rather than iterating through every zone in the building we iterate over every zone set. 

Function breakdown: How does it work?

We start by declaring our functions name, parameters and return type:

				
					Function GetZoneSet(name As String, doc As TAS3D.T3DDocument) As TAS3D.zoneSet

    'function code goes here
    
End Function


This function is called GetZoneSet, its parameters are a name as a string and doc which is a reference to the Tas3D.T3DDocument we wish to search through. The function returns a reference variable to a Tas3D.zoneSet; if it doesnt find one, it returns nothing. 

				
					Dim curZoneSetIndex As Integer
Dim curZoneSet As TAS3D.zoneSet
curZoneSetIndex = 1


We start by defining some variables  we’ll use while we’re looking through all the zoneSets in the file. We use the curZoneSetIndex integer variable to keep track of the index of the zoneSet we are currently working with. The first zoneSet in a Tas3D document is given an index of 1, so we must set the initial value of our curZoneSetIndex to 1. 

We use the curZoneSet reference variable to refer to the current zoneSet.

				
					While Not doc.Building.GetZoneSet(curZoneSetIndex) Is Nothing

    'set the current zone set reference to the next zone set
    'TODO
    
    'check to see if the name matches what we're looking for. If it does, return the zone set.
    'TODO

    'increment the index so we look at the next zone set when the loop repeats
    curZoneSetIndex = curZoneSetIndex + 1
Wend


On line 1, we check to see if there is a zone set in the Tas3D document we passed in as a parameter with an index equal to curZoneSetIndex. If there is a zone set, GetZoneSet will return something (rather than nothing), and we will enter the while loop.

Before we reach the Wend of the while loop and the condition on line 1 is re-evaluated, we increment the curZoneSetIndex by 1 so we look at the next zone set in the file. If there is no zone set with that index, GetZoneSet returns nothing so we do not enter the while loop again. 

				
					While Not doc.Building.GetZoneSet(curZoneSetIndex) Is Nothing

    'set the current zone set reference to the next zone set
    Set curZoneSet = doc.Building.GetZoneSet(curZoneSetIndex)
    
    'check to see if the name matches what we're looking for. If it does, return the zone set.
    If curZoneSet.name = name Then
        Set GetZoneSet = curZoneSet
        Exit Function
    End If

    'increment the index so we look at the next zone set when the loop repeats
    curZoneSetIndex = curZoneSetIndex + 1
Wend


On line 4, we set our zoneSet reference variable to the zone set with index curZoneSetIndex.

On line 7, we check to see if the name of that zone set matches the one we’re looking for that we passed in as a parameter. If it does, on line 8 we set the return value of the function to the currentZoneSet and on line 9 we exit the function early so we don’t consider any more zone sets. 

				
					'If we finish the loop without finding the zone set, return nothing
Set GetZoneSet = Nothing


Finally, if we have passed the end of the while loop without finding the zone set with the name we are looking for, we set the return value of the function to nothing. 

Putting it all together

Now that we’ve written our new functions to check for existing zone names and zone sets, we are ready to modify our existing macro to sort the new zones into zone sets. I’ve highlighted some of the main changes. 

				
					Sub AddZoneNames()
    'Read the file path from the spreadsheet
    Dim filePath As String
    filePath = Cells(1, 5)

    'Open the 3D modeller
    Dim t3dApp As TAS3D.T3DDocument
    Set t3dApp = New TAS3D.T3DDocument

    'Declare a variable for checking if operations were successful
    Dim ok As Boolean

    'Try to open the existing file
    ok = t3dApp.Open(filePath)

    'Check if it did open successfully
    If Not ok Then
        MsgBox "Couldnt open the file; is it in use?"
        Exit Sub
    End If
    

    'Define our loop variables
    Dim rowIndex As Integer
    Dim zoneName As String
    Dim zoneSetName As String
    Dim zoneSet As TAS3D.zoneSet
    Dim newZone As TAS3D.Zone

    'Set the starting rowIndex
    rowIndex = 2

    'Check each zone name cell to see if it contains something
    While Not IsEmpty(Cells(rowIndex, 1))

        'Read the zone name from excel
        zoneName = Cells(rowIndex, 1)
        
        'Read the zone set name from excel
        zoneSetName = Cells(rowIndex, 2)
        
        'Check that zone name isnt already in use
        If ZoneExists(zoneName, t3dApp) Then
            Cells(rowIndex, 3) = "Skipped"
        Else
        
            'Get the zone set if it exists
            Set zoneSet = GetZoneSet(zoneSetName, t3dApp)
            
            'If it doesnt exist, make a zone set with that name
            If zoneSet Is Nothing Then
                Set zoneSet = t3dApp.Building.AddZoneSet(zoneSetName, "", 0)
            End If
             
    
            'Add a zone to the zone set
            Set newZone = zoneSet.AddZone()
    
            'Change the name of the zone we just added
            newZone.name = zoneName
            
            'Note that the addition was a success
            Cells(rowIndex, 3) = "Added"
    
        End If

        'Increment the row index (so we read the next cell down)
        rowIndex = rowIndex + 1
    Wend

    'Save the file and check the save was successful
    ok = t3dApp.Save(filePath)

    If Not ok Then
        MsgBox "Couldn't save the file!"
        Exit Sub
    End If

    'Close the file
    t3dApp.Close

    'Close the 3D modeller
    Set t3dAppp = Nothing

    'Message box, so we know when it's done running
    MsgBox "Finished!"

End Sub


Rather than use a fixed name for the new zone set, we read the zone set name from the worksheet:

				
					    'Read the zone set name from excel
    zoneSetName = Cells(rowIndex, 2)


Before we check to see whether a zone set exists with this name, we should check to see if a zone already exists with this name. Why? Because if we check after we’ve already created a new zone set, we might end up making an empty zone set and then realising we have no zone to put in it as a zone with that name already exists in a different zone set!

				
					'Check that zone name isnt already in use
If ZoneExists(zoneName, t3dApp) Then
    Cells(rowIndex, 3) = "Skipped"
Else

  ' ... code to add the new zone & zone set ...
  
End If


On line 2, we are calling our ZoneExists function as the condition to an if statement with the zoneName we read from the spreadsheet and a reference to our Tas3D document. If the function returns true, this means a zone with that name already exists in the 3D file. We therefore write the message “Skipped” next to that row in the spreadsheet so the user is notified that there was a problem.

If ZoneExists returns false, this means there is no zone with that name in the file already so we can create it and add it.

				
					        'Check that zone name isnt already in use
        If ZoneExists(zoneName, t3dApp) Then
            Cells(rowIndex, 3) = "Skipped"
        Else
        
            'Get the zone set if it exists
            Set zoneSet = GetZoneSet(zoneSetName, t3dApp)
            
            'If it doesnt exist, make a zone set with that name
            If zoneSet Is Nothing Then
                Set zoneSet = t3dApp.Building.AddZoneSet(zoneSetName, "", 0)
            End If
             
    
            'Add a zone to the zone set
            Set newZone = zoneSet.AddZone()
    
            'Change the name of the zone we just added
            newZone.name = zoneName
            
            'Note that the addition was a success
            Cells(rowIndex, 3) = "Added"
    
        End If


On line 7, we use our GetZoneSet function to search through the Tas3D document and look for a zone set with the name we desire. If it finds one, our zoneSet reference variable is set to a valid reference to that zone set. 

If GetZoneSet cannot find one, the zoneSet variable will reference Nothing, so we check for this on line 10. If it is equal to nothing, we know we need to add a new zone set and name it, so this is what we do on line 11. 

By the time we get to line 16, the zoneSet variable should refer to a valid zone set. We can therefore add a new zone to that zone set, and set the name. 

On line 22, we leave a comment that the addition was successful, so the user knows that zone was added to the file. 

Details: "Nothing"

In previous lessons, we discussed Primitive and Reference variables. Primitive variables must always have a value; if we define a new primitive variable and do not set its value, it will have a default value:

				
					Dim number as integer  'The default value is 0


Reference variables may not always point to a valid object, and may point to Nothing. This is the default value for reference variables:

				
					Dim someText as String 'Default value is Nothing
Dim doc as Tas3D.T3DDocument 'Default value is Nothing


We should therefore be aware that functions that return reference variables may sometimes have values of Nothing. We must check for this, because if we try to call a function that belongs to the type the reference variable controls and the reference variable controls Nothing, we’ll get an error and our program will break. 

When we test for nothing, we cannot use the equals operator – we have to use the is keyword

				
					Dim doc as Tas3D.T3DDocument() 'default value is Nothing

'Check for nothing
If doc Is Nothing Then
    'doc is an invalid reference
End If

'Check for something
If Not doc Is Nothing Then
    'doc is a valid reference
End If


For more information about the Nothing value, see this page. 

Next Lesson

We haven’t really introduced anything new in this lesson, we’ve just been using the concepts introduced in previous lessons. This is great news, as it means we have already covered a lot of the programming basics. 

In the next lesson, we’ll discuss how we can modify our macro to make it faster for large files. 
Learn to Code with Tas and Excel Lesson 2 – Tas3D Zone Writer

Learn to Code with Tas and Excel Lesson 2 - Tas3D Zone Writer

In the last lesson of this series, we learned how to setup our machine to write macros, and we wrote our first simple Excel macro. Our first macro:

  • Opened an instance of the 3D modeller
  • Created a new 3D modeller document
  • Changed the building name
  • Saved & closed the file

In this lesson, we’ll write a macro that can read zone names from an excel spreadsheet and add them to an existing 3D modeller file. Specifically, we’ll:

  • Open an instance of the 3D modeller
  • Open an existing 3D modeller document
  • Add new zones to the file with names read from the spreadsheet
  • Save & close the file. 

We’ll then modify our macro to create zone groups for the new zones, and we’ll also add the option to read out the existing zones list from the 3D modeller file. 

As promised in the last post, we’re building on the things we learned already. So lets dive in. 

Part 1: Adding zone names to Tas3D files

Before you begin...

To begin, we’ll need a new 3D modeller file. Just open the 3D modeller and save the blank file to your desktop. 

We’ll also need a list of zone names in excel:


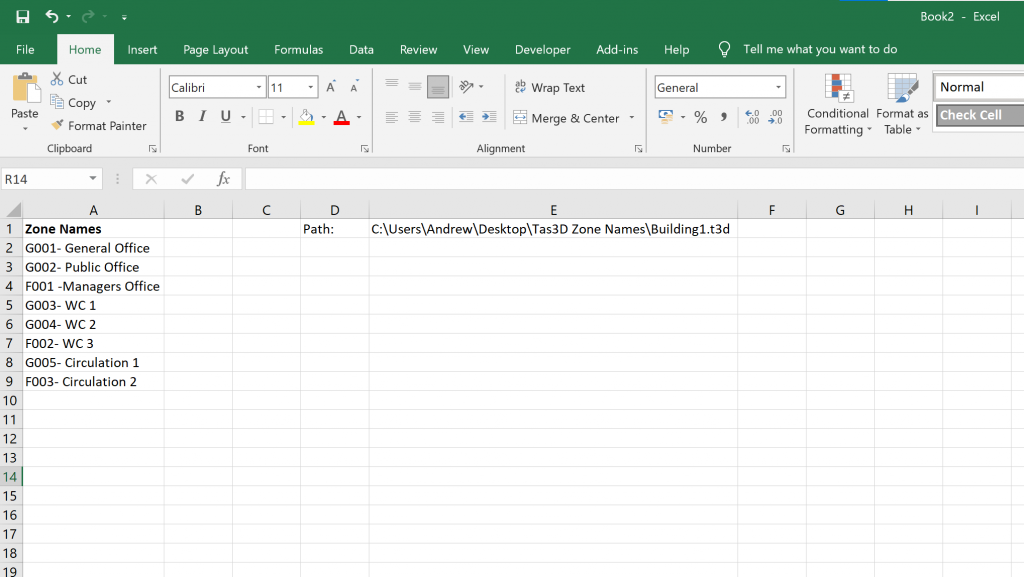
These zone names can be whatever you like, but I’ve added a column header of ‘Zone Names’ in cell A1 so I can identify which data is in that column. I have also added the file path to the Tas3D file we wish to operate on in cell E1. 

The script

As with last time, we’ll look at the script as a whole before breaking down each part. Have a read of it and see if you can understand what’s going on before we go into detail:

				
					Sub AddZoneNames()
    'Read the file path from the spreadsheet
    Dim filePath As String
    filePath = Cells(1, 5)
    
    'Open the 3D modeller
    Dim t3dApp As TAS3D.T3DDocument
    Set t3dApp = New TAS3D.T3DDocument
    
    'Declare a variable for checking if operations were successful
    Dim ok As Boolean
    
    'Try to open the existing file
    ok = t3dApp.Open(filePath)
    
    'Check if it did open successfully
    If Not ok Then
        MsgBox "Couldnt open the file; is it in use?"
        Exit Sub
    End If
    
    'Define our loop variables
    Dim rowIndex As Integer
    Dim zoneName As String
    Dim newZone As TAS3D.Zone
    
    'Set the starting rowIndex
    rowIndex = 2
    
    'Check each zone name cell to see if it contains something
    While Not IsEmpty(Cells(rowIndex, 1))
    
        'Read the zone name from excel
        zoneName = Cells(rowIndex, 1)
        
        'Add a zone to the default zone group
        Set newZone = t3dApp.Building.GetZoneSet(1).AddZone()
        
        'Change the name of the zone we just added
        newZone.Name = zoneName
        
        'Increment the row index (so we read the next cell down)
        rowIndex = rowIndex + 1
    
    Wend
    
    'Save the file and check the save was successful
    ok = t3dApp.Save(filePath)
    
    If Not ok Then
        MsgBox "Couldn't save the file!"
        Exit Sub
    End If
    
    'Close the file
    t3dApp.Close
    
    'Close the 3D modeller
    Set t3dAppp = Nothing
        
    'Message box, so we know when it's done running
    MsgBox "Finished!"
    
End Sub


Lots going on here! We’ve started using primitive variables,  return values from functions, while loops, if statements and control statements. But as always, we’ll break it down slowly and go into more detail about each of these topics at the end of the post. 

We start by reading the file path from the spreadsheet:

				
					    'Read the file path from the spreadsheet
    Dim filePath As String
    filePath = Cells(1, 5)


On line 2, we dimension a variable of type string (a variable that can hold text), and on line 3 we set its value equal to whatever is in the cell with row index 1 and column index 5. This corresponds to cell E1. Note that we didn’t need to use the set keyword — this is because the filePath variable is a primitive type. We only use the set keyword when we’re working with objects. 

Why did we do this? We did this because if we give our macro to a colleague or are using it a lot, its inconvenient to keep opening the code editor and having to find and change the line of code that determines which file we’re adding zone names to. We didn’t have to, but it makes things easier! And less intimidating for our colleagues.

We also need the file path when we open the file and save the file, so by reading it from the spreadsheet and storing it in a variable, we only have one place to change the file path when we’re working with a different file. Very neat. 

				
					'Open the 3D modeller
    Dim t3dApp As TAS3D.T3DDocument
    Set t3dApp = New TAS3D.T3DDocument


Next we dimension a new reference variable to control an instance of the 3D modeller, and then on line 3 we create the new instance using the new keyword and assign it to the t3dApp reference variable using the = operator and the set keyword. 

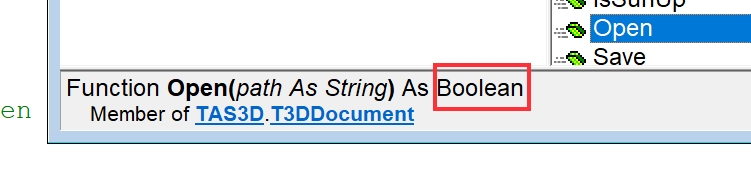
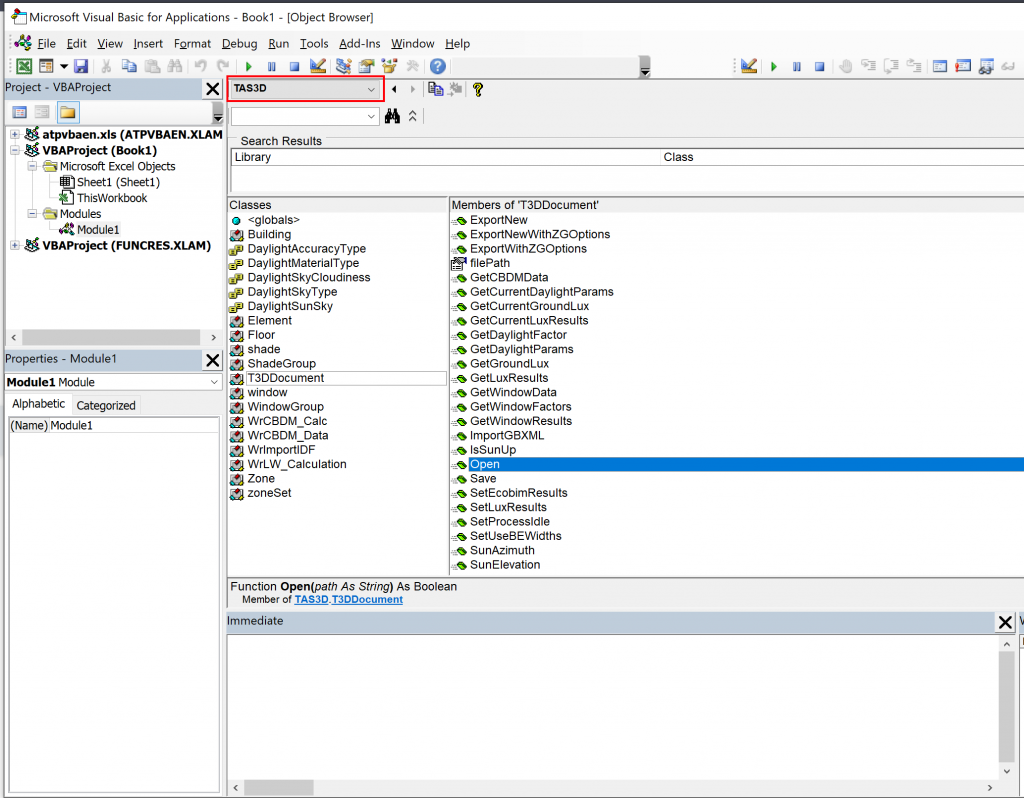
We’re almost ready to use the TAS3D.T3Document.Open function to open an existing 3D modeller file, but before we do, if we look at the function in the object browser we can see that it returns a value of type boolean:

A boolean is a primitive variable type which can be one of two values: True or False. What then, does it mean if the Open function returns True or False? Tas3D returns True when the open function is successful and false when the function is not successful.

For example, if you’re trying to open a file and the file is missing, (the file path could be invalid), the Open function will return False. This will also happen if the file is in use by another application or another instance of the 3D modeller. If the operation is successful, the function returns True.

In order to check the return value of this function, we’ll dimension a boolean variable called ‘ok’ to store the value the Open function returns and we’ll check to see what that value is after we have tried to Open the file:

				
					    'Declare a variable for checking if operations were successful
    Dim ok As Boolean


Now we can call the Open function, storing the functions return value in the ok variable:

				
					    'Try to open the existing file
    ok = t3dApp.Open(filePath)


Here, we have passed in the filePath variable we declared earlier and set to contain the value of cell E5. If cell E5 was empty, the Open function would return False, so it would be useful to check the result and exit our macro early if we couldn’t open the file. After all, there’s no point reading the zone names from the spreadsheet if we cant open the file we want to save them in!

				
					    'Check if it did open successfully
    If Not ok Then
        MsgBox "Couldnt open the file; is it in use?"
        Exit Sub
    End If


To check the value of the ok variable, we are using an if statement. We are saying if the value of ok is Not True, display a message box and exit our subroutine early. 

If statements are extremely useful as they control the flow of our macro based on conditions; for more information see the details box at the end of this post.

				
					 'Define our loop variables
    Dim rowIndex As Integer
    Dim zoneName As String
    Dim newZone As TAS3D.Zone
    
    'Set the starting rowIndex
    rowIndex = 2
    
    'Check each zone name cell to see if it contains something
    While Not IsEmpty(Cells(rowIndex, 1))
    
        'Read the zone name from excel
        zoneName = Cells(rowIndex, 1)
        
        'Add a zone to the default zone group
        Set newZone = t3dApp.Building.GetZoneSet(1).AddZone()
        
        'Change the name of the zone we just added
        newZone.Name = zoneName
        
        'Increment the row index (so we read the next cell down)
        rowIndex = rowIndex + 1
    
    Wend


Now to the heart of our macro. Remember what we’re trying to do. We need to:

  • Loop through each row that could contain a zone name and see if its empty
  • If there’s a zone name in that cell, store it in a variable
  • Add a new zone to the Tas3D file
  • Set the name of the new zone to be the one we read from the non-empty cell

In order to keep track of which row we’re currently looking at, we define a primitive variable rowIndex. On line 7, we set its initial value to 2 as row 1 column 1 contains the header Zone Name, and we dont want to accidentally create a zone name called Zone Name!

We also want a reference variable to control our new Zone object that we’ll create; we do so on line 4, and we dimension a primitive string variable to store the zone name we’ve read from the sheet. 

Line 10 is a While Loop. While the condition is true, the code between line 10 and the Wend on line 24 will repeat in order. 

First the while loop condition is checked; there is text in Cells(2,1), so we move onto line 13. 

On line 13 we read the zone name in Cells(2,1) and store it in the variable zoneName.

On line 16 we add a new Zone object to the first zone set in the Building object. We access the first zone set by using the GetZoneSet() function belonging to Building. If you look in the object browser, you’ll see its return type is TAS3D.ZoneSet, which has the function AddZone. 

On line 19 we change the Name of the Zone object to be the zone name we read earlier.

Next, we increment the rowIndex by 1, so its value goes from 2 -> 3. The while loop then repeats and checks to see if Cell(3,1) is empty.

As I only have 8 zone names in my spreadsheet, when rowIndex = 10, cells(10,1) will be empty and the while loop will stop executing. 

It this seems a bit confusing, watch the video accompanying this post as its easier to walk through each line with an explanation. We can even use the debugger in the visual basic environment to walk through each line one at a time to understand what’s happening, which I’ll demonstrate in the video. Also don’t forget to checkout the additional details at the bottom of this post, regarding while loops!

				
					'Save the file and check the save was successful
    ok = t3dApp.Save(filePath)
    
    If Not ok Then
        MsgBox "Couldn't save the file!"
        Exit Sub
    End If
    
    'Close the file
    t3dApp.Close
    
    'Close the 3D modeller
    Set t3dAppp = Nothing
        
    'Message box, so we know when it's done running
    MsgBox "Finished!"


By now you should be able to follow whats happening here; we use the ok variable we declared earlier to check to see whether the Save function executed successfully, and if it doesnt, we display a message and exit our macro early.

On line 10 we close the file, and then on line 13 we disconnect the reference variable that controls the 3D modeller instance from the object itself so Excel closes the 3D modeller instance for us.

We then display a helpful message box so we can tell when our macro has finished running. Though our macros so far have ran very quickly, if we had thousands of zone names in our spreadsheet it could take a little while!

What about zone sets?

Ok so far we’ve relied on the fact that our existing Tas3D file has a default zone set, and we’ve just added our new zones to that existing zone set. 

If we wanted to add our zones to a brand new zone set, we could modify our Macro as follows:

				
					Sub AddZoneNamesNewZoneSet()
    'Read the file path from the spreadsheet
    Dim filePath As String
    filePath = Cells(1, 5)
    
    'Open the 3D modeller
    Dim t3dApp As TAS3D.T3DDocument
    Set t3dApp = New TAS3D.T3DDocument
    
    'Declare a variable for checking if operations were successful
    Dim ok As Boolean
    
    'Try to open the existing file
    ok = t3dApp.Open(filePath)
    
    'Check if it did open successfully
    If Not ok Then
        MsgBox "Couldnt open the file; is it in use?"
        Exit Sub
    End If
    
    'Create a new zone set to store our zones in
    Dim newZoneSet As zoneSet
    Set newZoneSet = t3dApp.Building.AddZoneSet
    newZoneSet.Name = "My new zone set"
    
    'Define our loop variables
    Dim rowIndex As Integer
    Dim zoneName As String
    Dim newZone As TAS3D.Zone
    
    'Set the starting rowIndex
    rowIndex = 1
    
    'Check each zone name cell to see if it contains something
    While Not IsEmpty(Cells(rowIndex, 1))
    
        'Read the zone name from excel
        zoneName = Cells(rowIndex, 1)
        
        'Add a zone to the default zone group
        Set newZone = newZoneSet.AddZone()
        
        'Change the name of the zone we just added
        newZone.Name = zoneName
        
        'Increment the row index (so we read the next cell down)
        rowIndex = rowIndex + 1
    
    Wend
    
    'Save the file and check the save was successful
    ok = t3dApp.Save(filePath)
    
    If Not ok Then
        MsgBox "Couldn't save the file!"
        Exit Sub
    End If
    
    'Close the file
    t3dApp.Close
    
    'Close the 3D modeller
    Set t3dAppp = Nothing
        
    'Message box, so we know when it's done running
    MsgBox "Finished!"
    
End Sub


If you look at lines 23-25, you’ll see we first dimension a new ZoneSet reference variable so we can refer to our new zone set. We then create one by using the AddZoneSet function that belongs to the Building object. 

We then use that newZoneSet on line 42 and add the new zones directly to it. 

Question

What do you think would happen if we kept running our macro on the same Tas3D file?

Answer

The macro would keep adding zones with the same name to the 3D modeller file!

Details: If Statements

If statements control the flow of our macros and allow us to react differently to different situations. They take the form:

				
					If [condition] then
    'code for if its true
End if


This if statement executes the code between lines 1 and 3 if the condition is true. We can also execute different code if the condition is false:

				
					If [condition] Then
    'code if true
Else 
    'code if false
End If


We can also check multiple conditions in a single If Statement:

				
					If [condition 1] Then
    'code
Else If [condition 2] Then
    'code
Else If [condition 3] Then
    'code
End if


We can have as many ‘Else If’ statements as we like. 

The [condition] placeholders are statements that evaluate to a value of either  True or False. For example:

				
					'Example 1
Dim x as Integer
x = 4

If x = 4 Then
    'x is 4
Else
    'x is not 4
End If

'Example 2
If (1 + 5) = 6 Then
    'The condition is true
End If

'Example 3
Dim booleanValue as Boolean
booleanValue = True

If booleanValue Then
    'the booleanValue is true!
End If


We can also use the Not keyword to evaluate whether a condition evaluates to False (false is equivalent to ‘not true’):

				
					Dim x as Integer
Dim y as Integer
x = 4
y = 4

If Not x = y Then
    'The variables are not equal
End If


To learn more about If Statements, see ExcelEasy. 

Details: While Loops

While loops allow us to repeat a section of code while a condition is true. Remember, a condition is just a statement that evaluates to either True or False. 

				
					While [condition]

    'Some code

Wend


If the condition evaluates to False by the time we encounter the loop, the code in the loop will not be executed. 

If the condition is true, usually the code within the while loop has the ability to cause the condition to eventually evaluate to False, otherwise the loop would repeat forever!

				
					Dim x as Integer
x = 1

While x < 10            ' < is the less than operator
    
    'Write the value of x to the sheet
    Cells(x,1) = x
    
    'Increment the value of x
    x = x + 1
    
Wend


This snippet writes the numbers 1 to 9 to the current worksheet. The condition on line 4 gets evaluated every time the loop repeats, so as line 10 alters the value of x, eventually x will be equal to 10 and therefore the condition will be false and the code will stop repeating. 

There are a few different types of loops; there are For loops, While loops and Do While loops. For more information about loops, see ExcelEasy

Whats next?

Next time we’ll look at how we can modify our macro to dynamically add zones to different zone groups based on the contents of our excel spreadsheet, rather than just adding them all to the same spreadsheet. 

We’ll also keep an eye out for duplicate zone names. Click here to go to the next lesson.

Learn to Code with Tas and Excel Lesson 1 – Setup

Learn to Code with Tas and Excel Lesson 1 - Setup

In this post, I’ll run through how to get ready to write your first Excel macro. If you haven’t already, I suggest you read the intro post to find out more.

With each post in this series, there will be a written explanation and a video demonstrating what to do. 

1. License Tas

It might seem obvious, but please make sure your copy of Tas Engineering is licensed via the Register button in the Tas Manager. 

If your copy of Tas isn’t licensed properly, your Macro might behave strangely and it can lead to some very hard to track down bugs. 

2. Enable Excel developer Tab

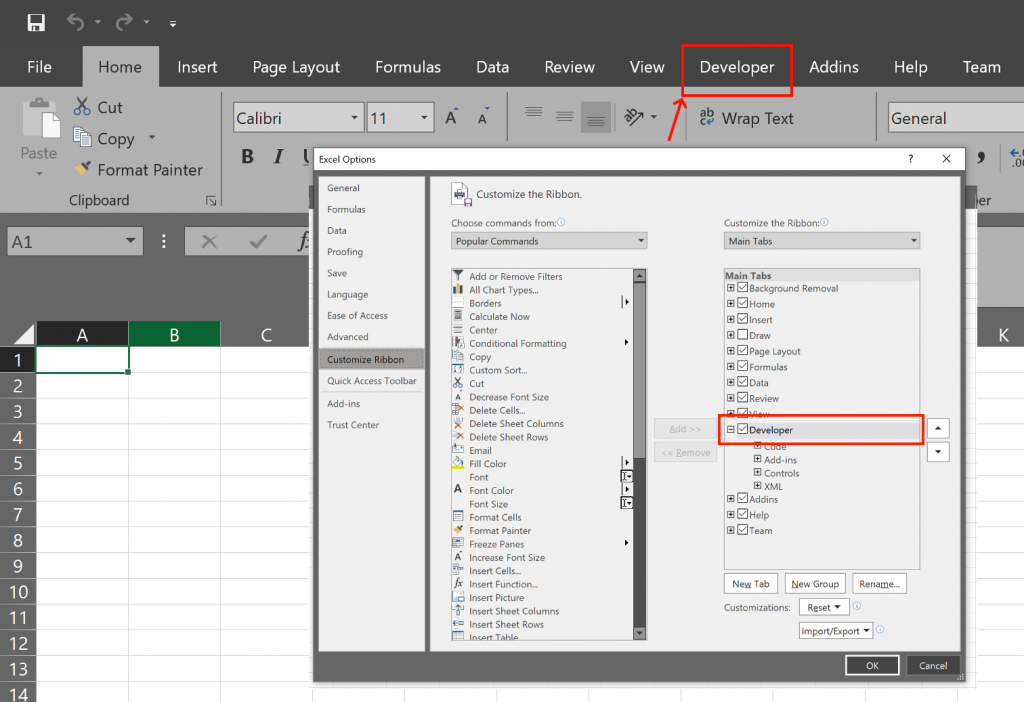
When we’re writing macros in Excel, we do so in the Visual Basic for Applications window. The button to open this is hidden away in the Developer tab in the ribbon, which isn’t visible by default.


To enable it, click on File > Options > Customise Ribbon, and check the Developer checkbox.


The developer tab also allows us to run our macros, and add buttons to our spreadsheet to make running them quicker and easier.


Once you’ve enabled this tab, it’ll should always be visible in your ribbon.

And thats it! That’s pretty much all you need to do. Now you just need to open the VBA editor and write your first macro!

Writing your first macro

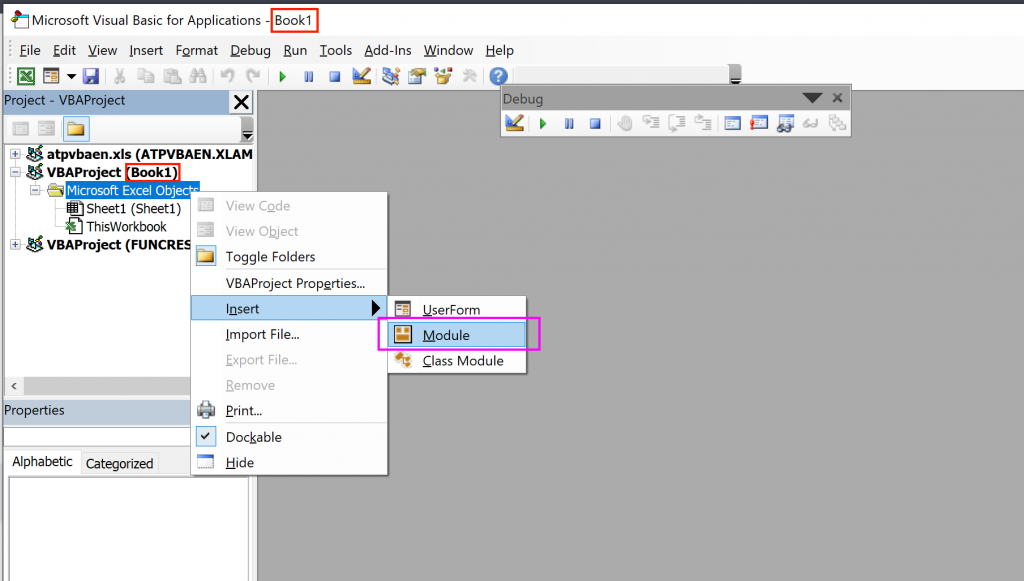
Add a new module

To open the Visual Basic editor, click on the Developer tab in the ribbon and click on the Visual Basic button. The VBA editor will pop up, and then you just need to add a module to start writing code:

Insert module into excel workbook

If all goes according to plan, you’ve created your first module and you’ll be presented with a white document in which you can type code. In case you’re wondering what a module is, it;s just a way to organise different bits of code and group them together

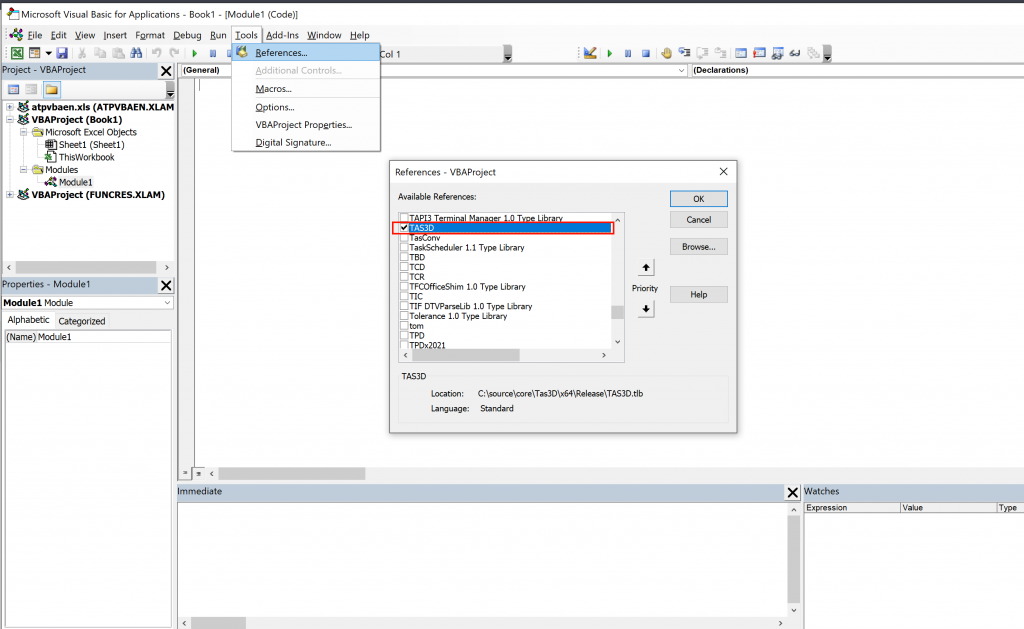
At this point you can start writing macros, but they wont be able to use Tas yet. To automate Tas, you’ll need to reference the appropriate type libraries.


Reference Tas Type Libraries

The Tas type libraries are files that tell the excel programming language what you can do when interacting with the Tas software.

To reference the Tas3D type library, click on Tools > References in the VBA editor, and select Tas3D:


If you are writing a macro that operates on TBD files or TCD files, you’ll need to pick those type libraries instead. The full list is:

  • 3D Modeller – Tas3D
  • Building Simulator – TBD
  • Constructions Database – TCD
  • Calendar Database- TCR
  • Internal Conditions Database – TIC
  • Weather Database – TWD
  • Systems – TPD
  • Ambiens – TAI
The Object Browser

After you’ve referenced the Tas type libraries, you can see what functions are available for a type library using the Object Browser. To open it, just press F2 on the keyboard or click on View > Object Browser:


Hello, Tas3D!

Lets write some code. Copy and paste the below code into your new module. You’ll need to change the file path to a folder on your computer.


					Sub HeloTas3D()
    
    'Open a new instance of the 3D modeller
    Dim t3dApp As TAS3D.T3DDocument
    Set t3dApp = New TAS3D.T3DDocument
    
    'Create a new document using the instance we just opened
    t3dApp.Create
    
        
    'Change the building name to "Hello, World!"
    t3dApp.Building.Name = "Hello, World!"
    
    'Save the 3D modeller file. YOU NEED TO CHANGE THIS LINE!
    t3dApp.Save ("C:\users\hilmya\desktop\MyNewFile.t3d")
    
    'Close the file
    t3dApp.Close
    
    'Close the 3D modeller instance
    Set t3dApp = Nothing
        
    'Message box, so we can tell when its finished
    MsgBox "Finished!"
End Sub


To run your macro, press F5 on your keyboard. The macro will run, and you should get a new Tas3D file created at the location you specified in line 15 of the previous code snippet and you should get a message box pop up saying “Finished” if everything ran OK.


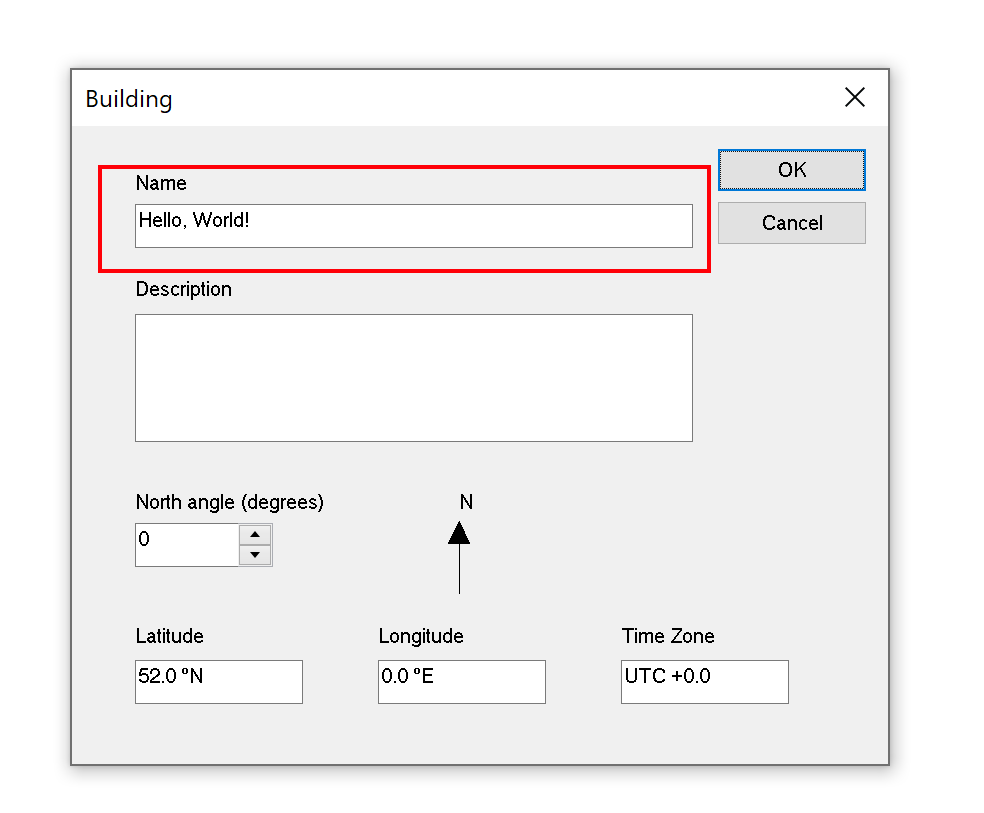
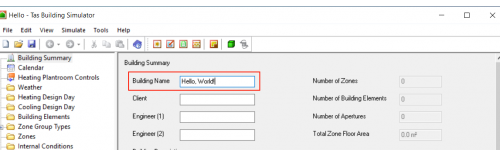
If you open the Tas3D file that was created when you ran your Macro and open the Building dialog (ctrl + B), you should see the phrase ‘Hello, World!’ in the building name field.


Rememebr, if you want to re-run your macro, you’ll need to delete the 3D modeller file first.

I don't understand the code!

Now that we’ve written and ran our first macro, lets go through each part of the Macro to understand whats going on in a bit more detail. We’ll start with creating a new instance of the 3D modeller:

				
					'Open a new instance of the 3D modeller
    Dim t3dApp As TAS3D.T3DDocument
    Set t3dApp = New TAS3D.T3DDocument


Line 1 is a comment – comments start with the apostrophe character, and allow us to leave notes to ourselves and our colleagues to help them understand the purpose of that section of code. Comments are really useful, as they can help us understand our intentions when we come back and review the code later.

Line 2 ‘Dimensions’ a new object reference variable called t3dApp with type TAS3D.T3Document.  Variables represent data which can change throughout the execution of your program, and there are two broad types – primitive variables and object reference variables. We’ll discuss these more in the next section.

For now, you can think of a reference variable like a remote control – we can use the remote control to control an object; in this case, an instance of the 3D modeller is the object.

Line 3 actually creates a new instance of the 3D modeller, and links up this new instance to the ‘remote control’ reference variable we created on the previous line.

You said I opened a new instance of the 3D modeller, but where is it? I dont see it!

When we create instances of the Tas applications using programming languages, they remain hidden – they have no visible User Interface (UI). This doesn’t mean you can’t see them, though!

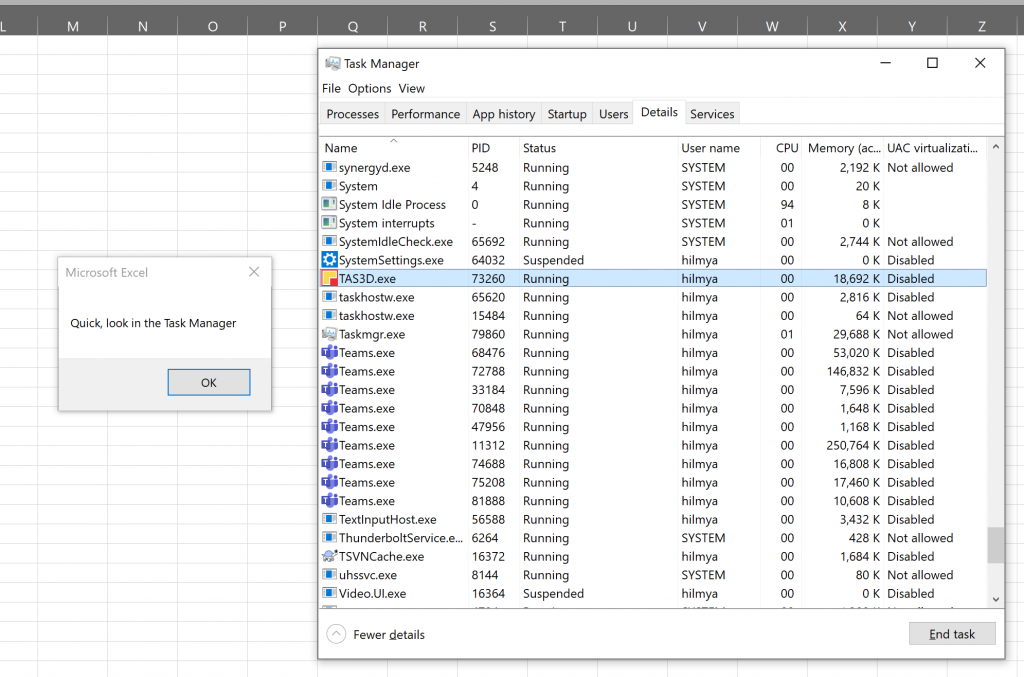
Run your macro again, but this time keep an eye on the ‘Processes’ list in the Windows Task Manager. You should see Tas3D appear when the macro starts, and dissappear when the macro finishes.

Too quick to see? We can add a message box to pause things so we can take a peek. Modify your macro like this:


					    'Open a new instance of the 3D modeller
    Dim t3dApp As TAS3D.T3DDocument
    Set t3dApp = New TAS3D.T3DDocument
    MsgBox "Quick, look in the Task Manager"


When you press OK, the macro will continue and the Tas3D instance will disappear.

				
					    'Create a new document using the instance we just opened
    t3dApp.Create


Next, as we’re creating a new 3D modeller document from scratch, we need to call the Create function.

This function tells the 3D modeller to make a new document – the 3D modeller creates default building elements, default zone lists and everything else you see when you create a new document using the user interface.

				
					    'Change the building name to "Hello, World!"
    t3dApp.Building.Name = "Hello, World!"


The 3D modeller file we just created has a Building property, and the Building property has a property called Name. In this step, we use the equals sign to change the value of that property to something else — in this case, the string “Hello, World!”. We used the equals sign earlier to ‘link up’ our Tas3D remote to our Tas3D object.

				
					'Save the 3D modeller file. YOU NEED TO CHANGE THIS LINE!
    t3dApp.Save ("C:\users\hilmya\desktop\MyNewFile.t3d")


Now we’re saving the file by calling the Save function — this is equivalent to pressing File > Save As in the 3D modeller. But as we don’t have a dialog to ask us where we want to save the file, we need to specify the file path using a string (the bit in the speech marks).

				
					    'Close the file
    t3dApp.Close
    
    'Close the 3D modeller instance
    Set t3dApp = Nothing


Next we use the Close function to close the file we created, and we set the t3dApp object reference variable to point to Nothing — this means it no longer controls the 3D modeller instance we opened earlier, so Excel will automatically close it as it can see we’re not using it any more.

				
					    'Message box, so we can tell when its finished
    MsgBox "Finished!"


Finally, we want to display a message box so its really clear that the macro has finished running. We do this using the MsgBox function thats built into excel, and we call this function using the string “Finished!”.

We’ve covered a lot in this first lesson and learned a lot of new things. Don’t worry if you feel overwhelmed, we’ll keep coming back to the things we’ve introduced in this first lesson as they’ll form the building blocks to more ambitious Macros!

If you haven’t watched the video for this lesson, I demonstrate and discuss the content of this lesson in more detail, so definitely watch it!

Details - Subroutines, Functions, Methods and Properties

Subroutines, functions and methods are essentially the same things and the terms often get used interchangably. They’re just ‘organisational blocks of code’, which can be re-used.

In VBA, subroutines cannot return a value but functions can. For example:


					'This function adds two numbers, and gives the value back to the code that executed it
Function AddNumbers(number1 As Double, number2 As Double) As Double
     AddNumbers = number1 + number2
End Function


					'This subroutine displays a message box containing the file path it is executed/called with
Sub FilePathMessageBox(FilePath As String)
    MsgBox FilePath
End Sub


The above function and subroutine have arugments – in the function they are called number1 and number2 and represent variables we wish to operate on within our function. Sometimes arugments are called Parameters.

Properties belong to Objects, (see the Details- Variables section), and are used to access variables that belong to that object. We saw one earlier when we accessed the Building property of the Tas3D document we created.

For more indepth information check out excel-easy.

Details - Variables & Objects

When a computer program is running, the computer program stores data in the computers memory. As a programmer, if you want to store data in memory and access it when your program is running, you can do so with Variables.

Lets look at the following simple macro:

				
					Sub StringVariable()
    
    Dim FirstName As String
    
    FirstName = Cells(1, 1)
    
    MsgBox FirstName
End Sub


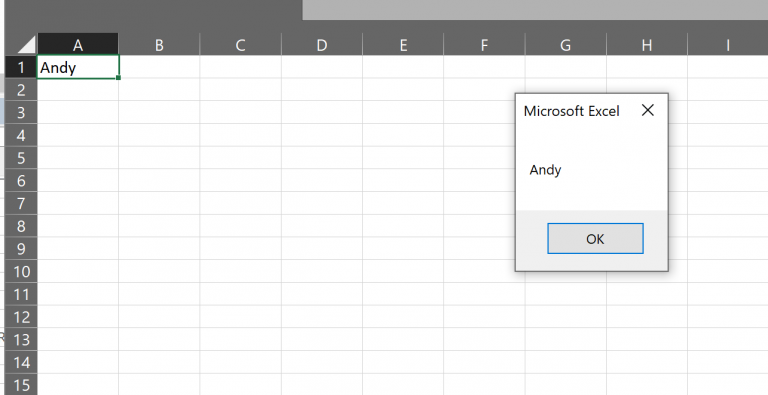
Here, we’re creating a String variable calle FirstName, and setting its value to whatever is in cell A1 in the current Excel spreadsheet. We then display a messagebox showing the value of that String:


This enables us to react dynamically to the data we have and make our macro operate accordingly. 

I mentioned earlier that there are two broad types of variable – primitive variables and object reference varables. Primitive variables store simple values – things like text and numbers. Object reference variables store a reference to an Object – an Object is just a group of reference variables and possibly some functions associated with them.

Primitive Variables

  • Integer  – stores whole numbers, example- 56, -2, 12
  • Single – stores small decimal numbers – 12.5, 8.0, 12.2545, -45.32
  • Double – stores decimal numbers with more accuracy – 34.32234543476767
  • Boolean – stores true/false values. 

Non Primitive Variables

  • String – stores text, example – “Hello, there!”
For more information about variables, see excel-easy.

If you’ve made it this far and you’re still with me, well done! In the next lesson, we’ll make a macro that writes zone names to an existing 3D modeller file!

Coding: Take your Tas modelling to the next level

Coding: Take your Tas Modelling to the next level with Excel

				
					Sub Hello()
    Dim model As TAS3D.T3DDocument
    Set model = New TAS3D.T3DDocument
    
    model.Building.Name = "Hello, World!"
End Sub
				
			
hello_world_tbd_cropped

When EDSL sponsored the CIBSE Building Simulation Awards 2020, I noticed that almost all of the candidates had one thing in common; the use of Python scripts, macros and other programming tools to supercharge their modelling capability.

There’s no doubt coding is going to form an important part of the energy modelling of the future, but many feel overwhelmed by the prospect and don’t know where to start. Sound familiar? If so, this blog post series is for you.

In this series of blog posts, i’ll explain how to get started with the Tas Application Programming Interface – no prior experience required. The tools you’ll need to get started? A copy of Tas Engineering and Microsoft Excel.

Which programming languages are supported?

The Tas API has been part of Tas Engineering since the very beginning, which makes it extremely powerful. It uses features built into the Micorsoft Windows operating system which means it can be used with almost every programming language that will run on your PC, including:

  • Microsoft .net (c#, vb.net)
  • Python
  • Visual Basic for Applications (VBA; excel)
  • Java
  • C++, C
  • Matlab/Octave
You can even use it with Jupyter notebooks!

Why Excel?

With so much choice available and with Visual Basic for Applications (VBA) being fairly old, it’s a fair question! I chose Excel because:

  • Almost everyone has it
  • Excel is a great way to store data
  • The language is very similar to VB.net (very modern)

Almost everyone has it – you don’t need to waste time downloading, installing and setting up complicated development environments on every computer you’re using or want to run your program on.

Storing Data – When your clients send you data for internal conditions, how often does arrive as an Excel document? Wouldn’t it be great if you could press a button in excel and have the data go straight into your TBD file?

Language Similarity – As VBA is so similar to VB.net, when you’re ready to transition to a more modern and more powerful language, it’ll be a breeze. All the techniques I’ll teach you are transferrable, as most modern programming languages have a surprising amount in common!

What will I learn?

In this series of blog posts, I’ll teach you the basics of the Tas Programming Interface using practical examples of automating every day tasks.

Tas3D

We’ll start with the 3D modeller, and how to quickly create zones and zone groups in your Tas3D file directly from excel.

We’ll then run a daylight calculation, and write the lux levels to an Excel spreadsheet.

Next we’ll export our model and merge it with our TBD file.

TBD

When we get to the Building Designer, we’ll write a macro to quickly and effortlessly create Internal Conditions.

We’ll also write a macro to read/write heating and cooling loads from zones.

We’ll then simulate the TBD file to TSD.

TSD

We’ll write a script to extract results to a table, and process the data to look for certain values.

In order to teach you how to do these things, i’ll also need to teach you the basics of Object Oriented Programming — i’ll teach you the basics of variables, loops and conditions.

I’ll also introduce you to the Excel API!

I'm stuck! Help!

If, at any time along the way, you feel a bit lost and confused and run into any difficulty with the exercises in this tutorial series, don’t panic — I’m here to help. Just email the support team, mention this blog and your message will find its way to me and I’ll see what I can do.

If you do run into any difficulty and are able to resolve it, I’d still like to hear about it so I can improve the content for other learners such as yourself!

Whats Next?

In the next post, i’ll be showing you how to get started with Excel and Tas, and how to write your first macro! Click here to check it out.

Importing DOE-2 INP

Importing DOE-2 INP (eQuest) files into Tas

You can now import DOE-2 INP files from packages such as eQuest directly into Tas. You can then easily perform daylight analysis such as calculating daylight factors and Climate Based Daylight Modelling (CBDM), and thermal/HVAC simulations without having to re-create the geometry and constructions in Tas.

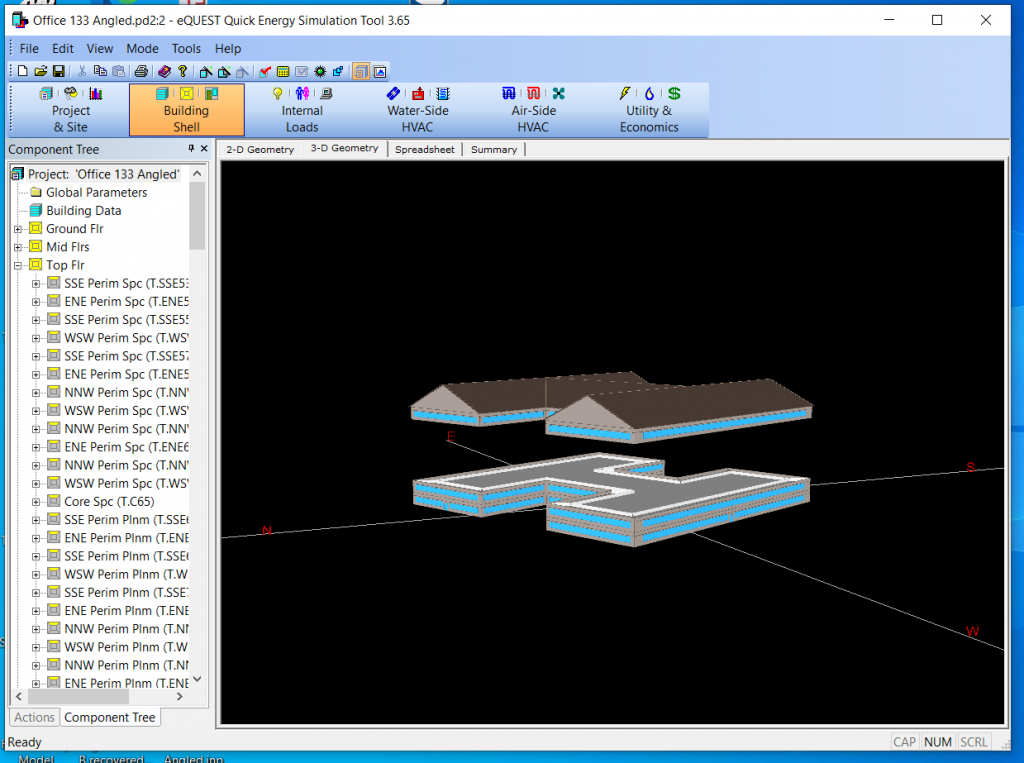
Original geometry in eQuest
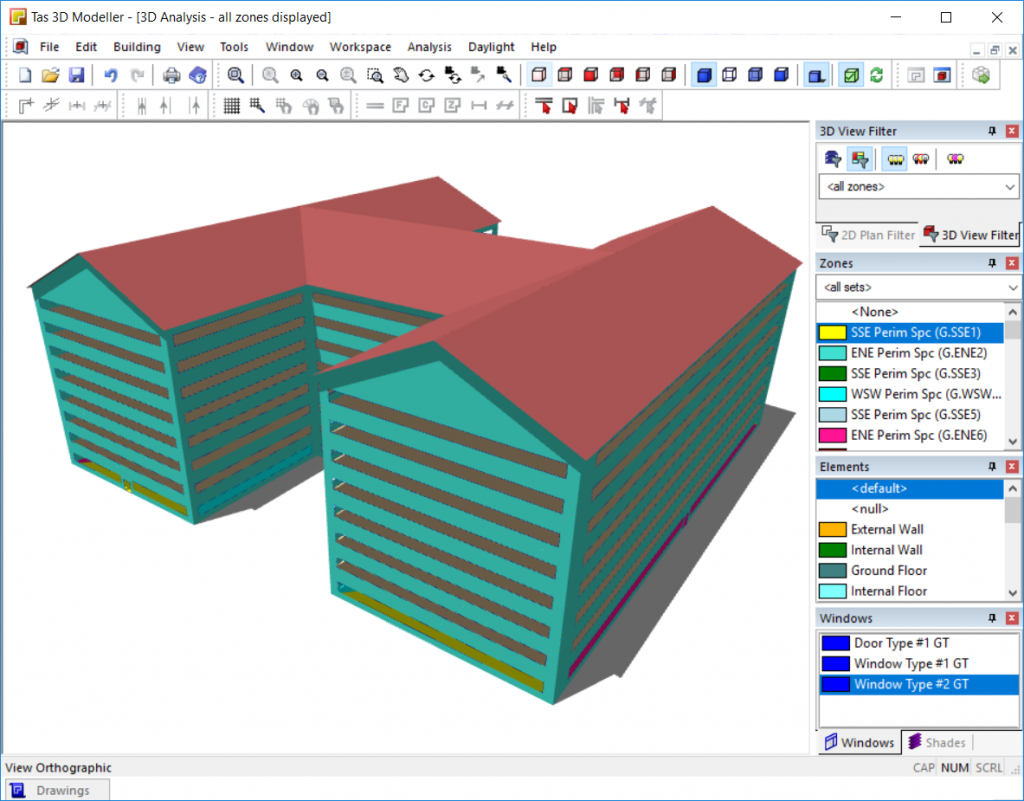
Geometry imported into the Tas 3D modeller

There are three routes you can take to import DOE-2 INP data into Tas:

  • Import into the 3D modeller (Tas3D)
  • Import into the Building Simulator (TBD)
  • Import into both Tas3D and TBD and merge the data

Importing into the 3D Modeller

If you want to import geometry and building element type data into the 3D modeller, you can do so via File  >> Import. 

You will be able to:

  • Perform daylight calculations (Daylight Factors, CBDM)
  • Change zoning, surface types & building element assignments
  • Export to the Building Simulator (TBD)
DOEImportMainForm

Importing into the Building Simulator

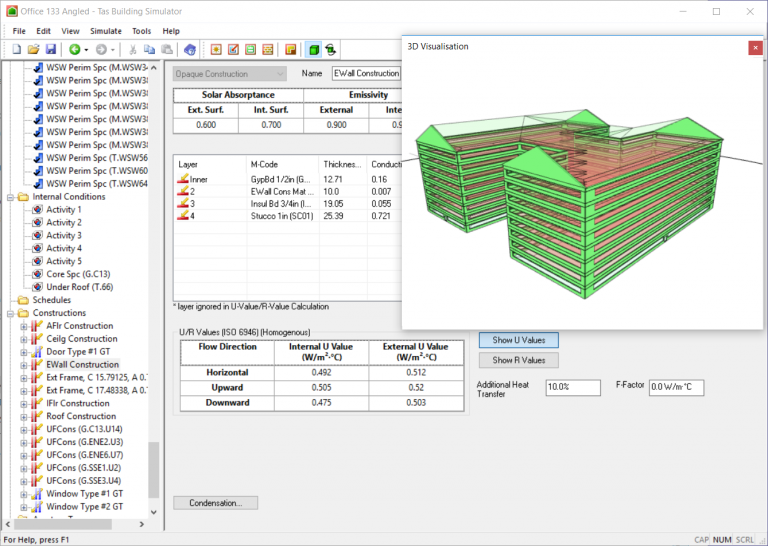
The Visualisation in the building simulator allows you to quickly inspect zones and their applied constructions/internal gains

If you want to import geometry directly into the building simulator, you can do so via the import utility:

  • Geometry, constructions & Internal Gains/Activity data will be imported (everything required for an annual simulation)
  • Weather data in Tas TWD or EnergyPlus EPW format can be imported at the same time 

You can therefore simulate the file immediately after importing with no further changes required!

How fast is it?

We created a 200 room model in eQuest and imported it into Tas3D and the Building Simulator. We included weather data, and the import process took 10 seconds.

Can I import the 3D geometry & building data at the same time?

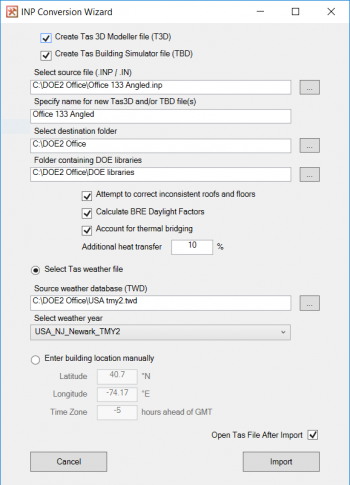
Yes! If you nagivate to the Utilities folder in the Tas Manager, you can import the DOE-2 INP files into the 3D modeller and the Building Simulator at the same time. 

My INP file has inconsistent geometry. Can I still import it?

Yes! The import utility has options to account for thermal bridging and to automatically correct inconsistent floor and inconsistent roof geometry. 

Automatically correcting footprints for badly defined floors saves you time and gives you extra confidence in the validity of the model. 

Want to try it?

If you’re an energy plus or eQuest user and want to try the DOE-2 INP import, you can get a free trial from here which includes full, unrestricted access to the software. 

If you have any questions about the software and its capabilities, get in touch and we’ll be happy to help. 

Calculating Daylight Factors

Daylight factors: What's the difference between the BRE method and the 3D modeller?

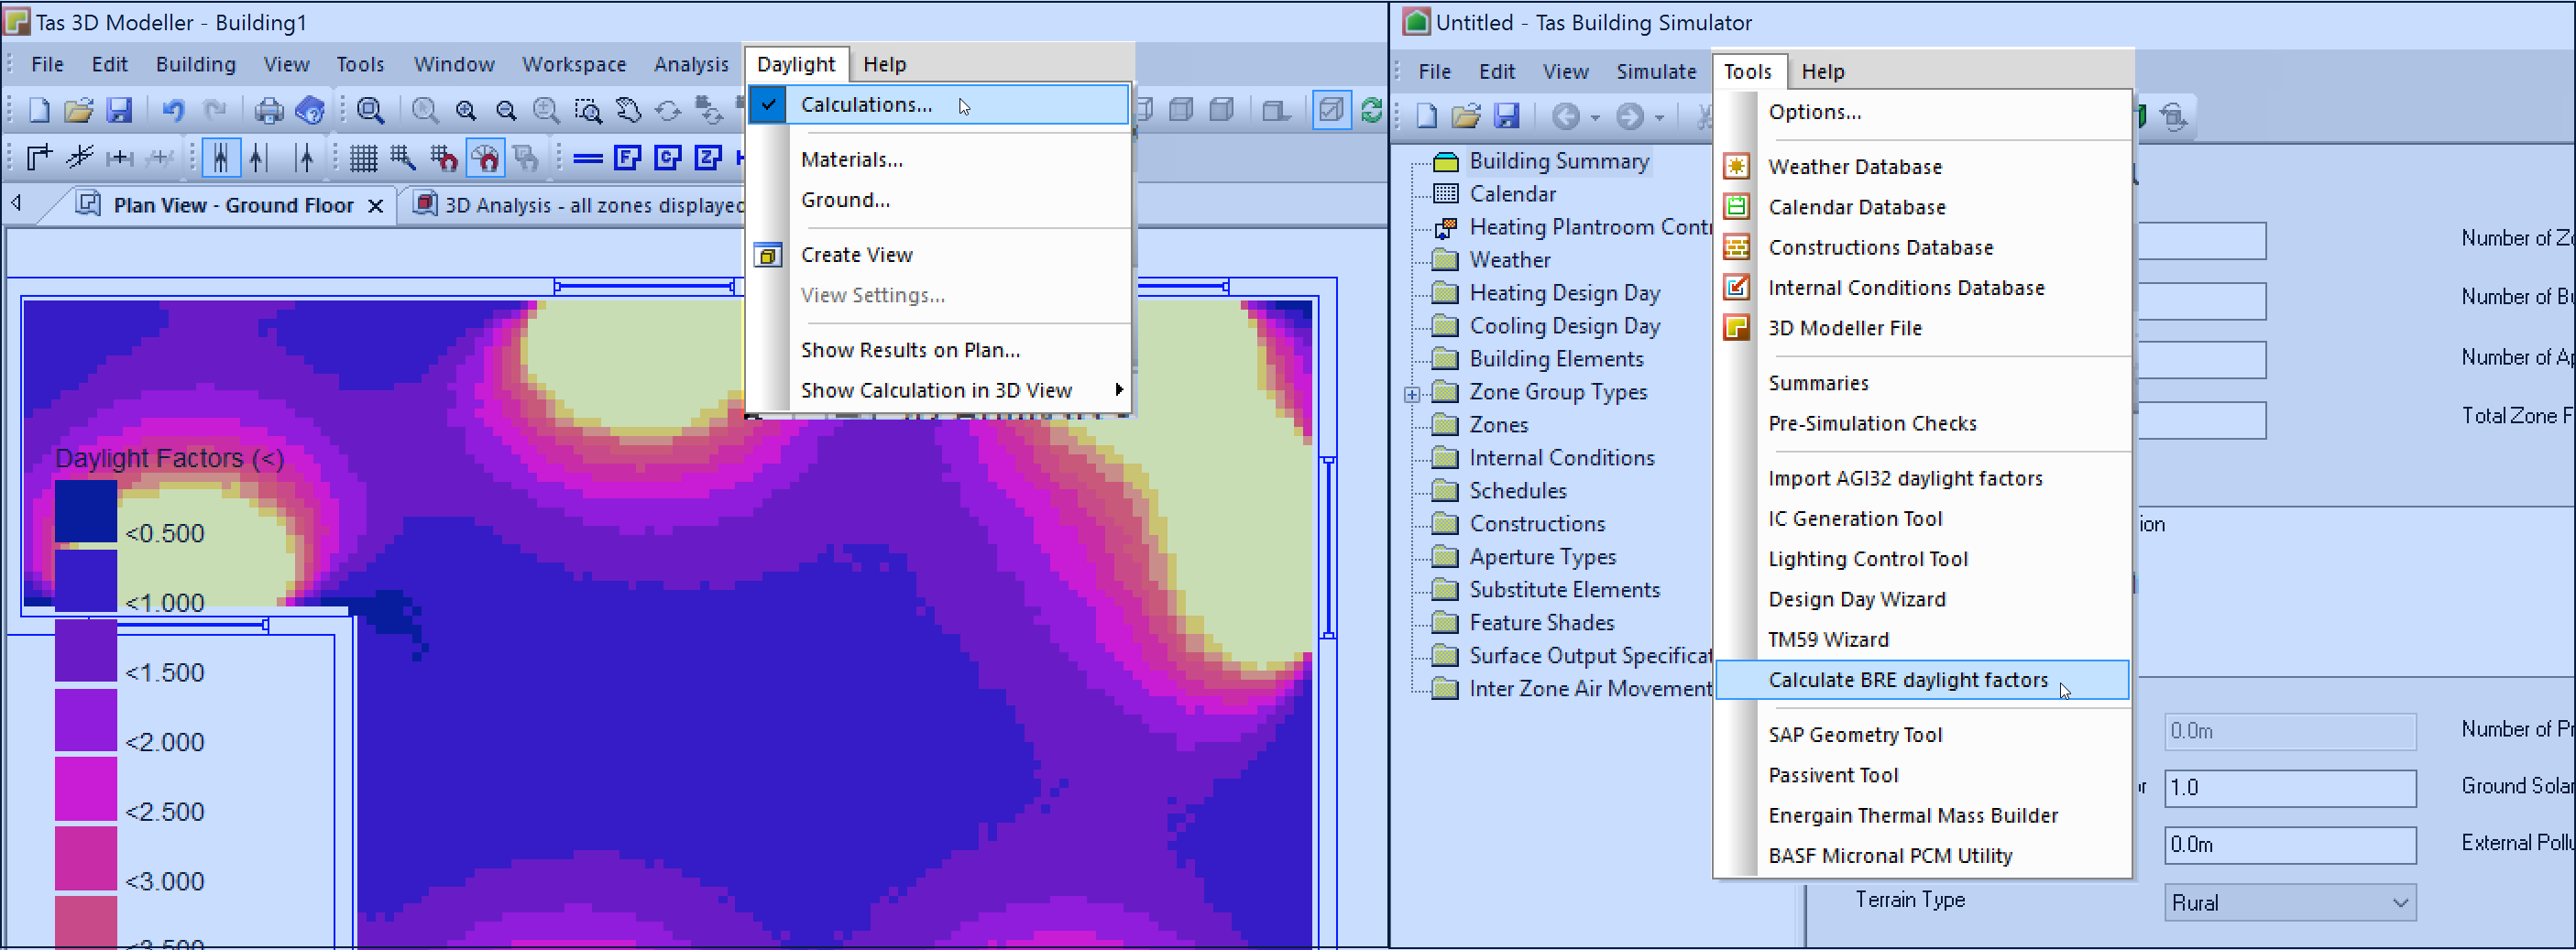
When carrying out a Part L2 or EPC Certification using Tas Engineering, you can calculate daylight factors using either the 3D modeller or the ‘BRE method’, both of which are covered on our Tas Engineering Training Course.  So what is the difference between these two methods, and what are the implications of using each?

Daylight calculations can be performed in the 3D modeller and the Builidng Simulator

BRE Method

The method outlined in the SBEM technical manual for estimating the daylight factor of a space is based on the ratio of the area of glazing to the total area of all surfaces in the space, making corrections for the light transmittance of the glazing.

\( Daylight Factor = \frac{(45 \times Window Area\times Light Transmittance)}{(Total Room Surface Area \times 0.76)}    \)

Formula for estimating daylight factor for side lit window

As the formula only requires surface areas and light transmittance, it is simply not able to make any allowance for a number of other variables which could severely impact the real daylight factors: 

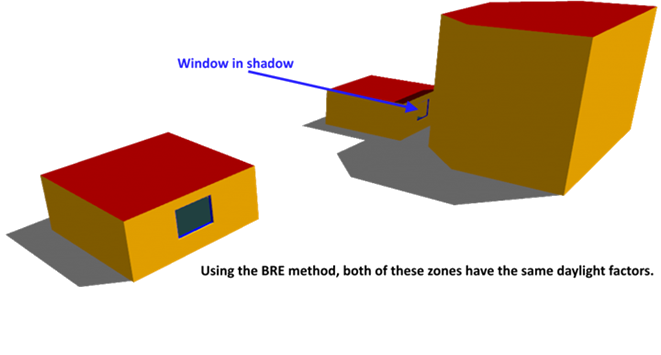
  • External shading – either other buildings or shading devices such as brise soleil.  If you have another building directly adjacent to your window, or shading fins largely obscuring the window, these will not reduce the daylight factors as they should.
  •       Complex internal geometry – for example this might be an unconventionally shaped room, a low bulkhead near the windows which might reflect more light straight back out, or sloped surfaces which would affect the reflectance within the space.
  •       Borrowed light – light which in reality enters your space through an adjacent zone via internal glazing, or ‘null’ partitions (e.g. in Tas, beyond the 6m perimeter zoning line) or through an atrium or lightwell/lightpipe.  No allowance can be made for these situations with the BRE Method
  •       ‘Lost light’ – In the same way that light can be ‘borrowed’ from another space, it can also be ‘lost’ to another space.  The formula above does not allow for light to be lost through for example a null wall at the rear of the zone, instead assuming all light contributes to the daylight factor of the study zone.

Why use the BRE method if it has such limitations?

Despite its limitations, the BRE method is still very useful; for simple geometries where there is no question of borrowed light or external shading the BRE method is a good approximation to the real value, and in addition it is very fast and easy to calculate. 

In order for software to calculate daylight factors more accurately, the software needs to have a daylighting engine and be able to take detailed geometry as an input. This daylight engine must carry out a simulation rather than a calculation, therefore will be more time consuming in terms of set up and analysis.


Tas 3D Modeller

Ready-made daylight model

One benefit of using Tas to calculate daylight factors is that you will already have built your 3D model in Tas 3D, so no additional time is required to produce a separate model for daylighting.  The model could potentially have great levels of detail and complexity, and some of the features listed above, including external/self-shading, complex internal arrangements, borrowed and lost light, etc.


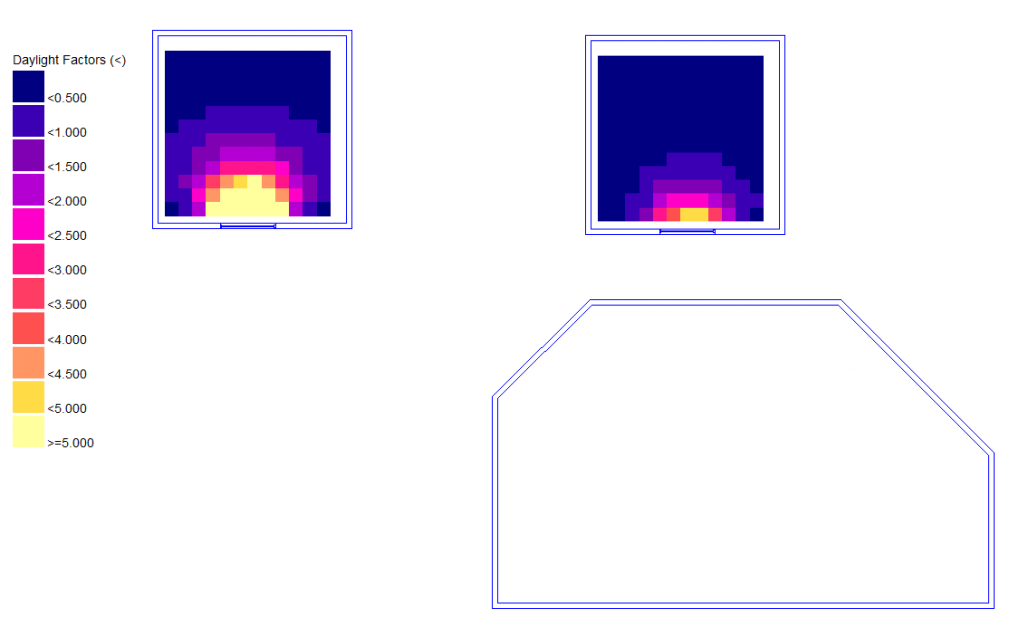
In the 3D Modeller, external geometry clearly affects daylight factors


As the latitude & longitude is already known in the 3D Modeller, the sun position can be calculated for the entire year and hence daylighting calculations can be performed for any hour of the year and for numerous sky models.  The user will just need to assign light reflectance and transmission values to each surface in the model, which can be set globally or uniquely, in one quick and easy process. 

The daylighting engine in the 3D modeller simulates luminous energy transfer between a light source (sun & sky), and each surface in the 3D model. That energy can be absorbed on the first surface it lands on, or a portion of it can be reflected to other surfaces any number of times.  The user can specify when to stop the simulation by adjusting the accuracy settings from a quick ‘no bounce’ calculation, right up to ‘detailed analysis’, where even the lowest accuracy setting will be more accurate than the BRE method.  The accuracy options in the 3D modeller have been designed so that increasing accuracy increases the daylight factor, so the no bounce option always represents the minimum daylight factor a space can expect.  ‘Detailed analysis’ gives you reassurance that a significant proportion of the initial light has been accounted for and so you can obtain the most accurate results in any situation.  


Which method should I use?

This may seem obvious – the BRE method appears limited and the 3D modeller method so accurate – why wouldn’t you always use the 3D modeller daylighting engine?  Well, in general our recommendation would be to always use the 3D modeller for its accuracy and certainty that it has fully accounted for the zone geometry, shading, inter reflections and so on.  However, the speed of the BRE method means that it may be very well suited to design work where window sizes and transmission value are changing very frequently, particularly if the project is very large. As the daylighting engine in the 3D modeller is so detailed, the larger the model the longer it will take to run.

As the design progresses then it will become important to ensure progress is based on full facts, and therefore it becomes increasingly important to ensure detailed simulation, in every respect.